Tag: programming

tidyverse: Example: Trump Approval Rate

tidyverse: Example: Trump Approval Rate

For those of you unfamiliar with the tidyverse, it is a collection of R packages that share common philosophies and are designed to work together. Most if not all, are created by R-god Hadley Wickham, one of the leads at RStudio. I was introduced to the tidyverse-packages such as ggplot2 and dplyr in my second R-course, and they have cleaned and sped up my workflow tremendously ever since.

Although I don’t want to mix in the political debate, I came across such a wonderful example of how the tidyverse has simplified coding in R. On the downside, those unfamiliar with the syntax have trouble understanding what happens in the code the author uses.

Running the following R-code will install the core packages of the tidyverse:

install.packages(‘tidyverse’)

These consist among others of the following:

  • ggplot2: a more potent way of visualization
  • tibble: an upgrade to the standard data.frame
  • dplyr: adds great new functionality for manipulating data frames
  • tidyr: adds even more new functions for wrangling data frames
  • magrittr: adds piping functionality to improve code readability and workflow
  • readr: provides easier functions to load in data
  • purr: adds new functional programming functionality

There are several other packages included (e.g, stringr), but the above are the ones you are most likely to use in everyday projects.

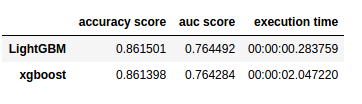
Now, how about dissecting the code in the post. The author (1) loads some functionality in R,  (2) scrapes data on approval rates from the web, (3) cleans it up, and creates a wonderful visualization. S/He does this all in only 35 lines of code! Better even, 2 of these code lines are blank, 3 are setup, 6 have aesthetic purposes, and many others could be combined being only several characters long. Due to the tidyverse syntax, the code is easy to read, transparent, and reproducible (it only consists of two chained code blocks, after loading the packages), and takes only 7 seconds to run!

   user  system elapsed 
   5.67    0.85    6.53

In the rest of this article, I walk you through the code of this post to explain what’s happening:

  • hrbrthemes includes additional ggplot2 themes (plot colors, etc.)
  • rvest includes functionalities for web scraping
  • tidyverse we discussed earlier
library(hrbrthemes) 
library(rvest)
library(tidyverse)

Below, the author then creates a list containing the links to the online data to scrape and run it through a magrittr pipe (%>%) to apply the next bit of code to it.

map_df() comes from the purrr package and applies the subsequent code to every element in the earlier list:

  • Read in the html files specified earlier in the list %>%
  • Convert them to a table %>%
  • Store the name of the list (this is the name of the president) as .id %>%
  • Store that as a data.frame %>%
  • Select columns (and rename them) %>%
  • Use the earlier stored president id and add it as a column (‘who’) %>%
  • Save the output as a dataframe called ratings.
list(
  Obama="http://m.rasmussenreports.com/public_content/politics/obama_administration/obama_approval_index_history",
  Trump="http://m.rasmussenreports.com/public_content/politics/trump_administration/trump_approval_index_history"
) %>% 
map_df(~{
    read_html(.x) %>%
      html_table() %>%
      .[[1]] %>%
      tbl_df() %>%
      select(date=Date, approve=`Total Approve`, disapprove=`Total Disapprove`)
  }, .id="who") -> ratings

Below, the author then starts a new chained code block. S/He first changes (mutate()), from the ratings dataframe, the approval & disapproval data with a custom function (get rid of the % sign and divide by 100), which is then piped through:

  • Mutate dates to a data format (lubridate is yet another tidyverse package) %>%
  • Filter out any missing values %>%
  • Group by the ‘who’-column (President name) %>%
  • Sort the data file by earlier specified date %>%
  • Give every line an id number, from 1 up to the number of records (n() returns the sample size per President due to the earlier group_by()) %>%
  • Ungroup the data %>%

For readability, I split the code here, but it actually still continues as depicted by the %>% at the end.

mutate_at(ratings, c("approve", "disapprove"), function(x) as.numeric(gsub("%", "", x, fixed=TRUE))/100) %>%
  mutate(date = lubridate::dmy(date)) %>%
  filter(!is.na(approve)) %>%
  group_by(who) %>%
  arrange(date) %>%
  mutate(dnum = 1:n()) %>%
  ungroup() %>%

The output is now entered into the ggplot2 visualization function below:

  • ggplot() creates a layered plot, where the aes(thetics) (parameters) are defined as
    • x = the id number,
    • y = the approval rate,
    • and the color = the President name

Layers and details to this plot are specified/added using +

  • The first (bottom) layer of the plot is geom_hline() which creates a horizontal line at [x = 0; y = 0.5] with a size = 0.5. +
  • The 2nd layer is a scatterplot as geom_point() adds points with size = 0.25 on the x & y predefined in ggplot(aes()) +
  • Next the limits of the Y-axis are set to run from 0 to 1 +
  • A custom/manual color scheme is set +
  • Custom titles and labels are applied to the axis +
  • A predefined theme for the plot is used, drawn from hrbrthemes-package loading in at the start +
  • The direction of the legend is set +
  • The position of the legend is set
  ggplot(aes(dnum, approve, color=who)) +
  geom_hline(yintercept = 0.5, size=0.5) +
  geom_point(size=0.25) +
  scale_y_percent(limits=c(0,1)) +
  scale_color_manual(name=NULL, values=c("Obama"="#313695", "Trump"="#a50026")) +
  labs(x="Day in office", y="Approval Rating",
       title="Presidential approval ratings from day 1 in office",
       subtitle="For fairness, data was taken solely from Trump's favorite polling site (Ramussen)",
       caption="Data Source: \nCode: ") +
  theme_ipsum_rc(grid="XY", base_size = 16) +
  theme(legend.direction = "horizontal") +
  theme(legend.position=c(0.8, 1.05))

Theggplot()command at the start automatically prints the plot when it is finished (when no more + is found). The result is just wonderful, isn’t it? With only 35 lines, 2 chained commands, and 7 seconds runtime.

Rplot

Found on https://www.r-bloggers.com.

Animated GIFs in R

Sometimes, it can be of interest to examine how two variables correlate over time. For example, how people in a social network (e.g., an organization) behave or move over the course of time. However, it can be hard to display multi-dimensional data in a single plot. Instead of including time as an additional dimension and providing stakeholders with complicated 3-D plots, ggplot2 now has a support package called gganimate, which allows you to create custom GIFs. Particularly helpful when you seek to demonstrate trends over time.

See this recent post by Analytics Vidhya for a tutorial on the implementation.


Light GBM vs. XGBOOST in Python & R

XGBOOST stands for eXtreme Gradient Boosting. A big brother of the earlier AdaBoost, XGB is a supervised learning algorithm that uses an ensemble of adaptively boosted decision trees. For those unfamiliar with adaptive boosting algorithms, here’s a 2-minute explanation video and a written tutorial. Although XGBOOST often performs well in predictive tasks, the training process can be quite time-consuming (similar to other bagging/boosting algorithms (e.g., random forest)).

In a recent blog, Analytics Vidhya compares the inner workings as well as the predictive accuracy of the XGBOOST algorithm to an upcoming boosting algorithm: Light GBM. The blog demonstrates a stepwise implementation of both algorithms in Python. The table below reflects the main conclusion of the comparison: Although the algorithms are comparable in terms of their predictive performance, light GBM is much faster to train. With continuously increasing data volumes, light GBM, therefore, seems the way forward.

Laurae also benchmarked lightGBM against xgboost on a Bosch dataset and her results show that, on average, LightGBM (binning) is between 11x to 15x faster than xgboost (without binning):

View interactively online: https://plot.ly/~Laurae/9/

However, the differences get smaller as more threads are used due to thread inefficiencies (idle-time increases because threads are not scheduled a next task fast enough).

Light GBM is also available in R:

devtools::install_github("Microsoft/LightGBM", subdir = "R-package")

Neil Schneider tested the three algorithms for gradient boosting in R (GBM, xgboost, and lightGBM) and sums up their (dis)advantages:

  • GBM has no specific advantages but its disadvantages include no early stopping, slower training and decreased accuracy,
  • xgboost has demonstrated successful on kaggle and though traditionally slower than lightGBM, tree_method = 'hist' (histogram binning) provides a significant improvement.
  • lightGBM has the advantages of training efficiency, low memory usage, high accuracy, parallel learning, corporate support, and scale-ability. However, its’ newness is its main disadvantage because there is little community support.

Keras: Deep Learning in R or Python within 30 seconds

Keras is a high-level neural networks API that was developed to enabling fast experimentation with Deep Learning in both Python and R. According to its author Taylor Arnold: Being able to go from idea to result with the least possible delay is key to doing good research. The ideas behind deep learning are simple, so why should their implementation be painful?

Keras comes with the following key features:

  • Allows the same code to run on CPU or on GPU, seamlessly.
  • User-friendly API which makes it easy to quickly prototype deep learning models.
  • Built-in support for convolutional networks (for computer vision), recurrent networks (for sequence processing), and any combination of both.
  • Supports arbitrary network architectures: multi-input or multi-output models, layer sharing, model sharing, etc. This means that Keras is appropriate for building essentially any deep learning model, from a memory network to a neural Turing machine
  • Fast implementation of dense neural networks, convolution neural networks (CNN) and recurrent neural networks (RNN) in R or Python, on top of  TensorFlow or Theano.

R

R: Installation

The R interface to Keras uses TensorFlow™ as it’s underlying computation engine. First, you have to install the keras R package from GitHub:

devtools::install_github("rstudio/keras")

Using the install_tensorflow() function you can then install TensorFlow:

library(keras)
install_tensorflow()

This will provide you with a default installation of TensorFlow suitable for use with the keras R package. See the article on TensorFlow installation to learn about more advanced options, including installing a version of TensorFlow that takes advantage of Nvidia GPUs if you have the correct CUDA libraries installed.

R: Getting started in 30 seconds

Keras uses models to organize layers. Sequential models are the simplest structure, simply stacking layers. More complex architectures require the Keras functional API, which allows to build arbitrary graphs of layers.

Here is an example of a sequential model (hosted on this website):

library(keras)

model keras_model_sequential() 

model %>% 
  layer_dense(units = 64, input_shape = 100) %>% 
  layer_activation(activation = 'relu') %>% 
  layer_dense(units = 10) %>% 
  layer_activation(activation = 'softmax')

model %>% compile(
  loss = 'categorical_crossentropy',
  optimizer = optimizer_sgd(lr = 0.02),
  metrics = c('accuracy')
)

The above demonstrates the little effort needed to define your model. Now, you can iteratively train your model on batches of training data:

model %>% fit(x_train, y_train, epochs = 5, batch_size = 32)

Next, performance evaluation can be prompted in a single line of code:

loss_and_metrics %>% evaluate(x_test, y_test, batch_size = 128)

Similarly, generating predictions on new data is easily done:

classes %>% predict(x_test, batch_size = 128)

Building more complex models, for example, to answer questions or classify images, is just as fast.

Python

A step-by-step implementation of several Neural Network architectures with Keras in Python can be found on DataCamp. Similarly, one may use this quick cheatsheet to deploy the most basic models.

Additional resources:

Online Resource: Efficient R Programming

Public Service Motivation is a theorized attribute of government and non-governmental organization employment that explains why individuals have a desire to serve the public and link their personal actions with the overall public interest (Wikipedia, 2017). Academics are often said to score highly on this public service motivation and I can’t but admire those that share their knowledge freely with the public.

Colin Gillespie and Robin Lovelace are perfect examples of altruistic contributors to society. Their latest book – Efficient R Programming – is a definite recommendation for anybody who wants to power-up their R code, beginner or more advanced programmer. On top of this, the authors provide the digital version free-of-charge!

Gradient Descent 101

Gradient Descent is, in essence, a simple optimization algorithm. It seeks to find the gradient of a linear slope, by which the resulting linear line best fits the observed data, resulting in the smallest or lowest error(s). It is THE inner working of the linear functions we get taught in university statistics courses, however, many of us will finish our Masters (business) degree without having heard the term. Hence, this blog.

Linear regression is among the simplest and most frequently used supervised learning algorithms. It reduces observed data to a linear function (Y = a + bX) in order to retrieve a set of general rules, or to predict the Y-values for instances where the outcome is not observed.

One can define various linear functions to model a set of data points (e.g. below). However, each of these may fit the data better or worse than the others. How can you determine which function fits the data best? Which function is an optimal representation of the data? Enter stage Gradient Descent. By iteratively testing values for the intersect (a; where the linear line intersects with the Y-axis (X = 0)) and the gradient (b; the slope of the line; the difference in Y when X increases with 1) and comparing the resulting predictions against the actual data, Gradient Descent finds the optimal values for the intersect and the slope. These optimal values can be found because they result in the smallest difference between the predicted values and the actual data – the least error.

Afbeeldingsresultaat voor linear regression plot r

The video below is part of a Coursera machine learning course of Stanford University and it provides a very intuitive explanation of the algorithm and its workings:

A recent blog demonstrates how one could program the gradient descent algorithm in R for him-/herself. Indeed, the code copied below provides the same results as the linear modelling function in R’s base environment.

gradientDesc  max_iter) { 
      abline(c, m) 
      converged = T
      return(paste("Optimal intercept:", c, "Optimal slope:", m))
    }
  }
}

# compare resulting coefficients
coef(lm(mpg ~ disp, data = mtcars)
gradientDesc(x = disp, y = mpg, learn_rate = 0.0000293, conv_theshold = 0.001, n = 32, max_iter = 2500000)

Although the algorithm may result in a so-called “local optimum”, representing the best fitting set of values (a & b) among a specific range of X-values, such issues can be handled but deserve a separate discussion.