Tag: text

Curated Regular Expression Resources

Curated Regular Expression Resources

Regular expression (also abbreviated to regex) really is a powertool any programmer should know. It was and is one of the things I most liked learning, as it provides you with immediate, godlike powers that can speed up your (data science) workflow tenfold.

I’ve covered many regex related topics on this blog already, but thought I’d combine them and others in a nice curated overview — for myself, and for you of course, to use.

If you have any materials you liked, but are missing, please let me know!

Contents


Introduction & Learning

Reading

Tutorials (interactive)

Video

Corey Shafer

The Coding Train

Language-specific

Python

Corey Shafer

R

Roger Peng

Testing & Debugging

debuggex.com

regex101.com

regextester.com | regexpal.com

regexr.com

ExtendsClass.com/regex-tester

rubular.com

pythex.com

Fun

Building a realistic Reddit AI that get upvoted in Python

Building a realistic Reddit AI that get upvoted in Python

Sometimes I find these AI / programming hobby projects that I just wished I had thought of…

Will Stedden combined OpenAI’s GPT-2 deep learning text generation model with another deep-learning language model by Google called BERT (Bidirectional Encoder Representations from Transformers) and created an elaborate architecture that had one purpose: posting the best replies on Reddit.

The architecture is shown at the end of this post — copied from Will’s original blog here. Moreover, you can read this post for details regarding the construction of the system. But let me see whether I can explain you what it does in simple language.

The below is what a Reddit comment and reply thread looks like. We have str8cokane making a comment to an original post (not in the picture), and then tupperware-party making a reply to that comment, followed by another reply by str8cokane. Basically, Will wanted to create an AI/bot that could write replies like tupperware-party that real people like str8cokane would not be able to distinguish from “real-people” replies.

Note that with 4 points, str8cokane‘s original comments was “liked” more than tupperware-party‘s reply and str8cokane‘s next reply, which were only upvoted 2 and 1 times respectively.

gpt2-bert on China
Example reddit comment and replies (via bonkerfield.org/)

So here’s what the final architecture looks like, and my attempt to explain it to you.

  1. Basically, we start in the upper left corner, where Will uses a database (i.e. corpus) of Reddit comments and replies to fine-tune a standard, pretrained GPT-2 model to get it to be good at generating (red: “fake”) realistic Reddit replies.
  2. Next, in the upper middle section, these fake replies are piped into a standard, pretrained BERT model, along with the original, real Reddit comments and replies. This way the BERT model sees both real and fake comments and replies. Now, our goal is to make replies that are undistinguishable from real replies. Hence, this is the task the BERT model gets. And we keep fine-tuning the original GPT-2 generator until the BERT discriminator that follows is no longer able to distinguish fake from real replies. Then the generator is “fooling” the discriminator, and we know we are generating fake replies that look like real ones!
    You can find more information about such generative adversarial networks here.
  3. Next, in the top right corner, we fine-tune another BERT model. This time we give it the original Reddit comments and replies along with the amount of times they were upvoted (i.e. sort of like likes on facebook/twitter). Basically, we train a BERT model to predict for a given reply, how much likes it is going to get.
  4. Finally, we can go to production in the lower lane. We give a real-life comment to the GPT-2 generator we trained in the upper left corner, which produces several fake replies for us. These candidates we run through the BERT discriminator we trained in the upper middle section, which determined which of the fake replies we generated look most real. Those fake but realistic replies are then input into our trained BERT model of the top right corner, which predicts for every fake but realistic reply the amount of likes/upvotes it is going to get. Finally, we pick and reply with the fake but realistic reply that is predicted to get the most upvotes!
What Will’s final architecture, combining GPT-2 and BERT, looked like (via bonkerfield.org)

The results are astonishing! Will’s bot sounds like a real youngster internet troll! Do have a look at the original blog, but here are some examples. Note that tupperware-party — the Reddit user from the above example — is actually Will’s AI.

COMMENT: 'Dune’s fandom is old and intense, and a rich thread in the cultural fabric of the internet generation' BOT_REPLY:'Dune’s fandom is overgrown, underfunded, and in many ways, a poor fit for the new, faster internet generation.'
bot responds to specific numerical bullet point in source comment

Will ends his blog with a link to the tutorial if you want to build such a bot yourself. Have a try!

Moreover, he also notes the ethical concerns:

I know there are definitely some ethical considerations when creating something like this. The reason I’m presenting it is because I actually think it is better for more people to know about and be able to grapple with this kind of technology. If just a few people know about the capacity of these machines, then it is more likely that those small groups of people can abuse their advantage.

I also think that this technology is going to change the way we think about what’s important about being human. After all, if a computer can effectively automate the paper-pushing jobs we’ve constructed and all the bullshit we create on the internet to distract us, then maybe it’ll be time for us to move on to something more meaningful.

If you think what I’ve done is a problem feel free to email me , or publically shame me on Twitter.

Will Stedden via bonkerfield.org/2020/02/combining-gpt-2-and-bert/

Getting started with Python in Visual Studio Code

Getting started with Python in Visual Studio Code

After several years of proscrastinating, the inevitable finally happened: Three months ago, I committed to learning Python!

I must say that getting started was not easy. One afternoon three months ago, I sat down, motivated to get started. Obviously, the first step was to download and install Python as well as something to write actual Python code. Coming from R, I had expected to be coding in a handy IDE within an hour or so. Oh boy, what was I wrong.

Apparently, there were already a couple of versions of Python present on my computer. And apparently, they were in grave conflict. I had one for the R reticulate package; one had come with Anaconda; another one from messing around with Tensorflow; and some more even. I was getting all kinds of error, warning, and conflict messages already, only 10 minutes in. Nothing I couldn’t handle in the end, but my good spirits had dropped slightly.

With Python installed, the obvious next step was to find the RStudio among the Python IDE’s and get working in that new environment. As an rational consumer, I went online to read about what people recommend as a good IDE. PyCharm seemed to be quite fancy for Data Science. However, what’s this Spyder alternative other people keep talking about? Come again, there are also Rodeo, Thonny, PyDev, and Wing? What about those then? A whole other group of Pythonista’s said that, as I work in Data Science, I should get Anaconda and work solely in Jupyter Notebooks! Okay…? But I want to learn Python to broaden my skills and do more regular software development as well. Maybe I start simple, in a (code) editor? However, here we have Atom, Sublime Text, Vim, and Eclipse? All these decisions. And I personally really dislike making regrettable decisions or committing to something suboptimal. This was already taking much, much longer than the few hours I had planned for setup.

This whole process demotivated so much that I reverted back to programming in R and RStudio the week after. However, I had not given up. Over the course of the week, I brought the selection back to Anaconda Jupyter Notebooks, PyCharm, and Atom, and I was ready to pick one. But wait… What’s this Visual Studio Code (VSC) thing by Microsoft. This looks fancy. And it’s still being developed and expanded. I had already been working in Visual Studio learning C++, and my experiences had been good so far. Moreover, Microsoft seems a reliable software development company, they must be able to build a good IDE? I decided to do one last deepdive.

The more I read about VSC and its features for Python, the more excited I got. Hey, VSC’s Python extension automatically detects Python interpreters, so it solves my conflicts-problem. Linting you say? Never heard of it, but I’ll have it. Okay, able to run notebooks, nice! Easy debugging, testing, and handy snippets… Okay! Machine learning-based IntelliSense autocompletes your Python code – that sounds like something I’d like. A shit-ton of extensions? Yes please! Multi-language support – even tools for R programming? Say no more! I’ll take it. I’ll take it all!

Linting messages in the editor and the Problems panel
Linting in VSC provides code suggestions

My goods friends at Microsoft were not done yet though. To top it all of, they have documented everything so well. It’s super easy to get started! There are numerous ordered pages dedicated to helping you set up and discover your new Python environment in VSC:

The Microsoft VSC pages also link to some more specific resources:

  • Editing Python in VS Code: Learn more about how to take advantage of VS Code’s autocomplete and IntelliSense support for Python, including how to customize their behvior… or just turn them off.
  • Linting Python: Linting is the process of running a program that will analyse code for potential errors. Learn about the different forms of linting support VS Code provides for Python and how to set it up.
  • Debugging Python: Debugging is the process of identifying and removing errors from a computer program. This article covers how to initialize and configure debugging for Python with VS Code, how to set and validate breakpoints, attach a local script, perform debugging for different app types or on a remote computer, and some basic troubleshooting.
  • Unit testing Python: Covers some background explaining what unit testing means, an example walkthrough, enabling a test framework, creating and running your tests, debugging tests, and test configuration settings.
IntelliSense and autocomplete for Python code
Python IntelliSense in VSC makes real-time code autocomplete suggestions

My Own Python Journey

So three months in I am completely blown away at how easy, fun, and versatile the language is. Nearly anything is possible, most of the language is intuitive and straightforward, and there’s a package for anything you can think of. Although I have spent many hours, I am very happy with the results. I did not get this far, this quickly, in any other language. Let me share some of the stuff I’ve done the past three months.

I’ve mainly been building stuff. Some things from scratch, others by tweaking and recycling other people’s code. In my opinion, reusing other people’s code is not necessarily bad, as long as you understand what the code does. Moreover, I’ve combed through lists and lists of build-it-yourself projects to get inspiration for projects and used stuff from my daily work and personal life as further reasons to code. I ended up building:

  • my own Twitter bot, based off of this blog, which I’ll cover in a blog soon
  • my own email bot, based off of this blog, which I’ll cover in a blog soon. It sends me cheerful pictures and updates
  • my own version of this Google images scraper
  • my own version of this Glassdoor scraper
  • a probabilistic event occurance simulator, which I’ll share in a blog post soon
  • a tournament schedule generator that takes in participants, teams (sizes), timeslots, etc and outputs when and where teams needs to play each other
  • a company simulator that takes in growth patterns and generates realistic HR data, which I plan to use in one of my next courses
  • a tiny neural network class, following this Youtube tutorial
  • solutions to the first 31 problems of Project Euler, which I highly recommend you try to solve yourself!
  • solutions to the first dozen problems posed in Automate the Boring Stuff with Python. This book and online tutorial forces you to get your hands dirty right from the start. Simply amazing content and the learning curve is precisely good

I’ve also watched and read a lot:

Although it is no longer maintained, you might find some more, interesting links on my Python resources page or here, for those transitioning from R. If only the links to the more up-to-date resources pages. Anyway, hope this current blog helps you on your Python journey or to get Python and Visual Studio Code working on your computer. Please feel free to share any of the stories, struggles, or successes you experience!

What Every Programmer Needs To Know About Encodings

What Every Programmer Needs To Know About Encodings

Kunststube wrote this great introduction to text encoding. Ever wondered why your Word document sometimes starts with ÉGÉìÉRÅ[ÉfÉBÉìÉOÇÕìÔǵÇ≠ǻǢ? Well, encoding‘s why. Kunststube introduces you to the wonderful world of ASCII, WLatin, Mac Latin, and UTF-8, -16 and -32.

Read the original articla via http://kunststube.net/encoding/

Debuggex: A regular expression testing tool

I came across this awesome regular expression tool I wanted to share. Debuggex allows you to interactively write, test and visually inspect what your regular expressions match in either Python, JavaScript, or Perl.

Read more about regular expressions here, for instance their implementation in R.

Generating Book Covers By Their Words — My Dissertation Cover

Generating Book Covers By Their Words — My Dissertation Cover

As some of you might know, I am defending my PhD dissertation later this year. It’s titled “Data-Driven Human Resource Management: The rise of people analytics and its application to expatriate management” and, over the past few months, I was tasked with designing its cover.

Now, I didn’t want to buy some random stock photo depicting data, an organization, or overly happy employees. I’d rather build something myself. Something reflecting what I liked about the dissertation project: statistical programming and sharing and creating knowledge with others.

Hence, I came up with the idea to use the collective intelligence of the People Analytics community to generate a unique cover. It required a dataset of people analytics-related concepts, which I asked People Analytics professionals on LinkedIn, Twitter, and other channels to help compile. Via a Google Form, colleagues, connections, acquitances, and complete strangers contributed hundreds of keywords ranging from the standard (employees, HRM, performance) to the surprising (monetization, quantitative scissors [which I had to Google]). After reviewing the list and adding some concepts of my own creation, I ended up with 1786 unique words related to either business, HRM, expatriation, data science, or statistics.

I very much dislike wordclouds (these are kind of cool though), but already had a different idea in mind. I thought of generating a background cover of the words relating to my dissertation topic, over which I could then place my title and other information. I wanted to place these keywords randomly, maybe using a color schema, or with some random sizes.

The picture below shows the result of one of my first attempts. I programmed everything in R, writing some custom functionality to generate the word-datasets, the cover-plot, and .png, .pdf, and .gif files as output.

canvas.PNG

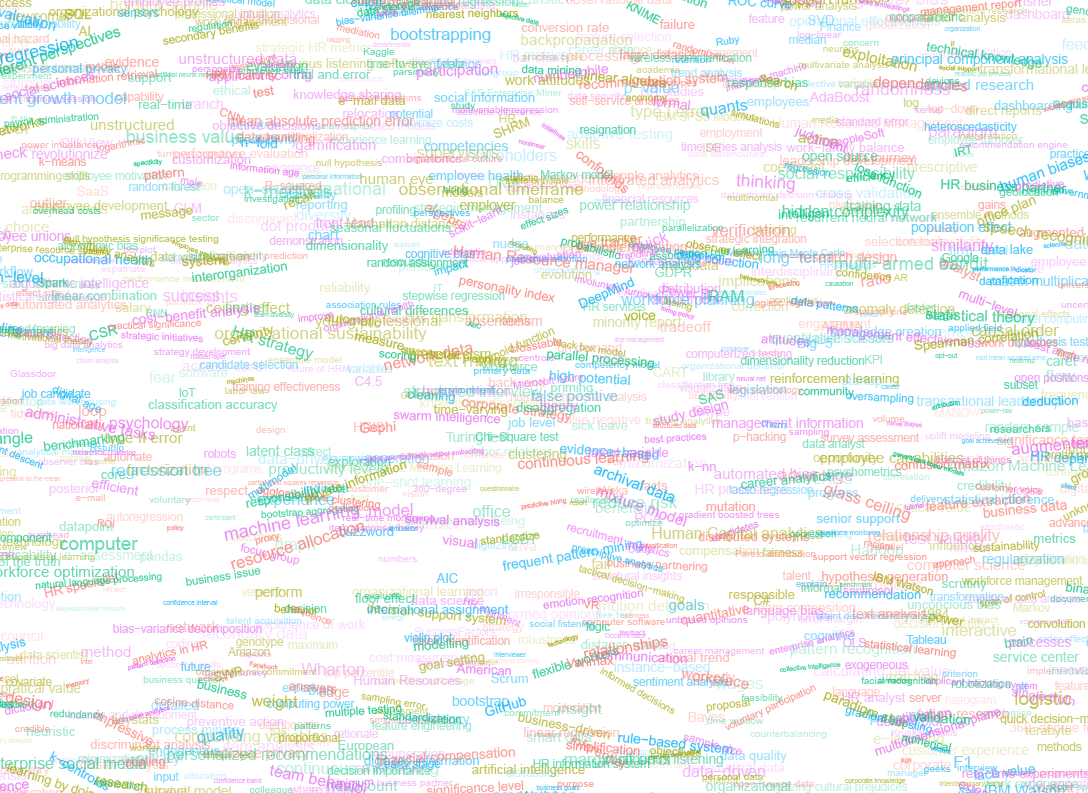
Random colors did not produce a pleasing result and I definitely needed more and larger words in order to fill my 17cm by 24cm canvas!

Hence, I started experimenting. Using base R’s expand.grid() and set.seed() together with mapply(), I could quickly explore and generate a large amount of covers based on different parameter settings and random fluctuations.

expand.grid(seed = c(1:3), 
            dupl = c(1:4, seq(5, 30, 5)),
            font = c("sans", "League Spartan"),
            colors = c(blue_scheme, red_scheme, 
                       rainbow_scheme, random_scheme),
            size_mult = seq(1, 3, 0.3),
            angle_sd = c(5, 10, 12, 15)) -> 
  param

mapply(create_textcover, 
       param$seed, param$dupl, 
       param$font, param$colors, 
       param$size_mult, param$angle_sd)

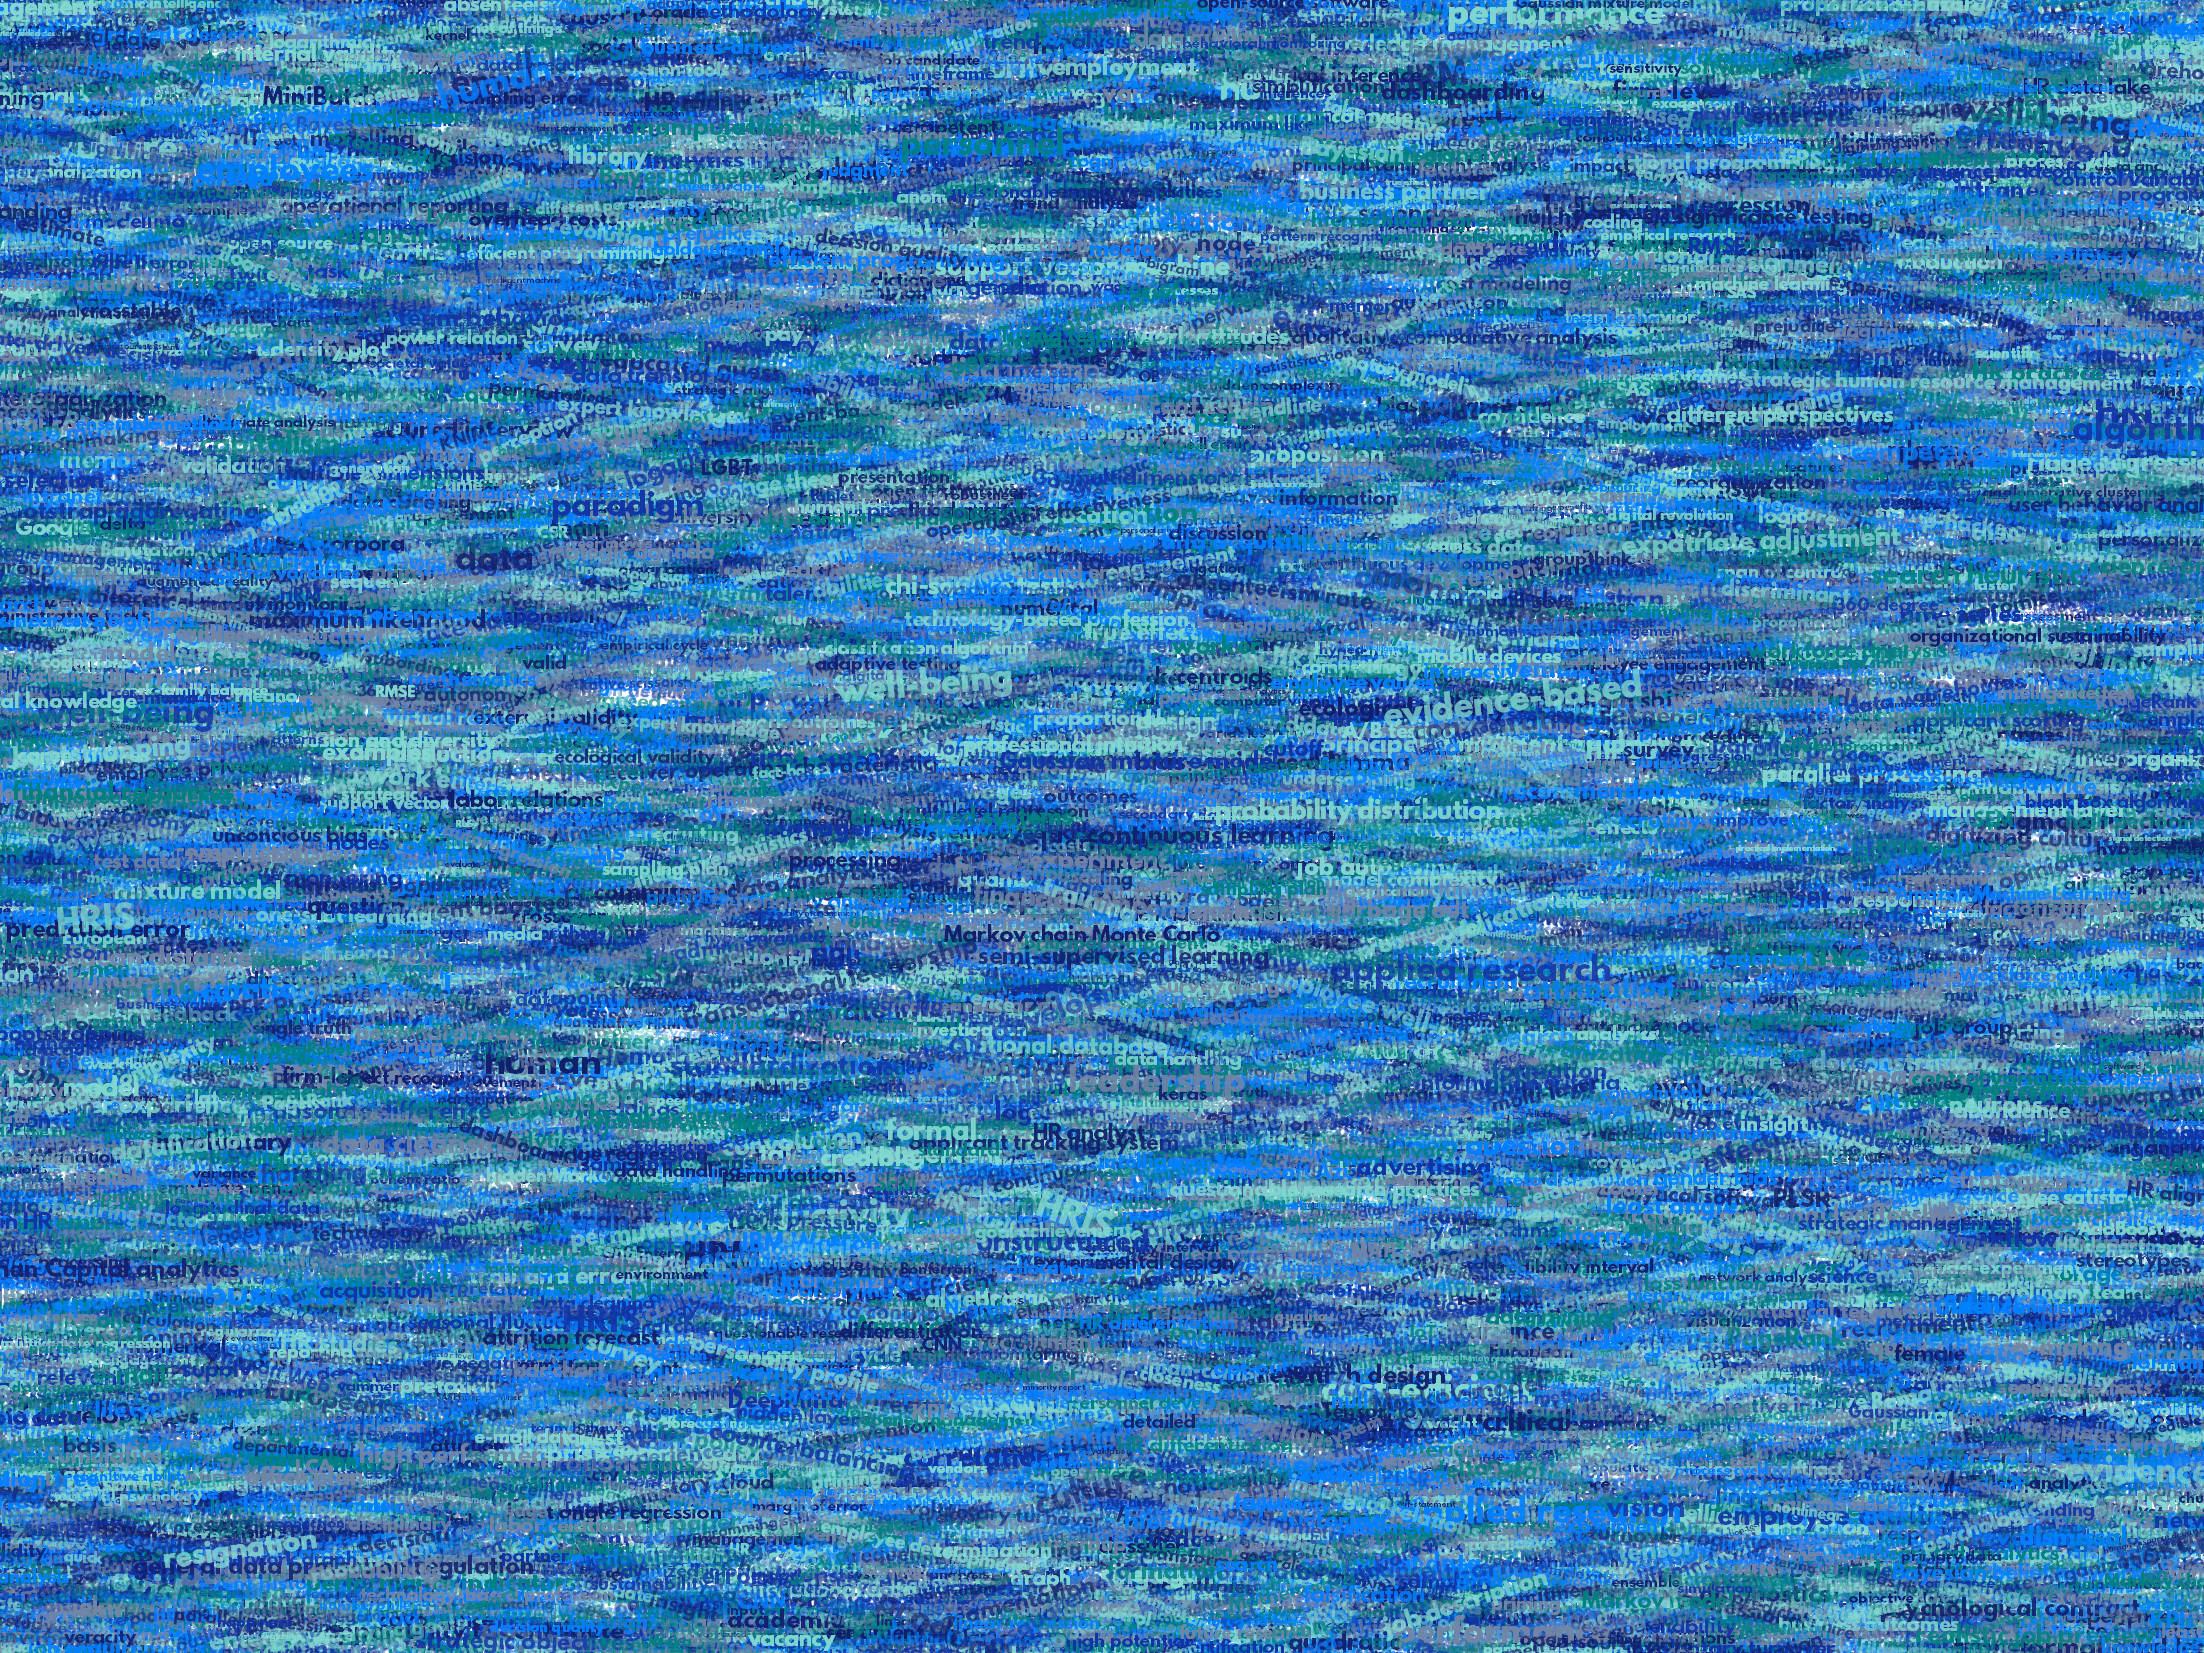
The generation process for each unique cover only took a few seconds, so I would generate a few hundred, quickly browse through them, update the parameters to match my preferences, and then generate a new set. Among others, I varied the color palette used, the size range of the words, their angle, the font used, et cetera. To fill up the canvas, I experimented with repeating the words: two, three, five, heck, even twenty, thirty times. After an evening of generating and rating, I came to the final settings for my cover:

  • Words were repeated twenty times in the dataset.
  • Words were randomly distributed across the canvas.
  • Words placed in random order onto the canvas, except for a select set of relevant words, placed last.
  • Words’ transparency ranged randomly between 0% and 70%.
  • Words’ color was randomly selected out of six colors from this palette of blues.
  • Words’ writing angles were normally distributed around 0 degrees, with a standard deviation of 12 degrees. However, 25% of words were explicitly without angle.
  • Words’ size ranged between 1 and 4 based on a negative binomial distribution (10 * 0.8) resulting in more small than large words. The set of relevant words were explicitly enlarged throughout.

With League Spartan (#thisisparta) loaded as a beautiful custom font, this was the final cover background which I and my significant other liked most:

cover_wordcloud_20-League Spartan-4.png

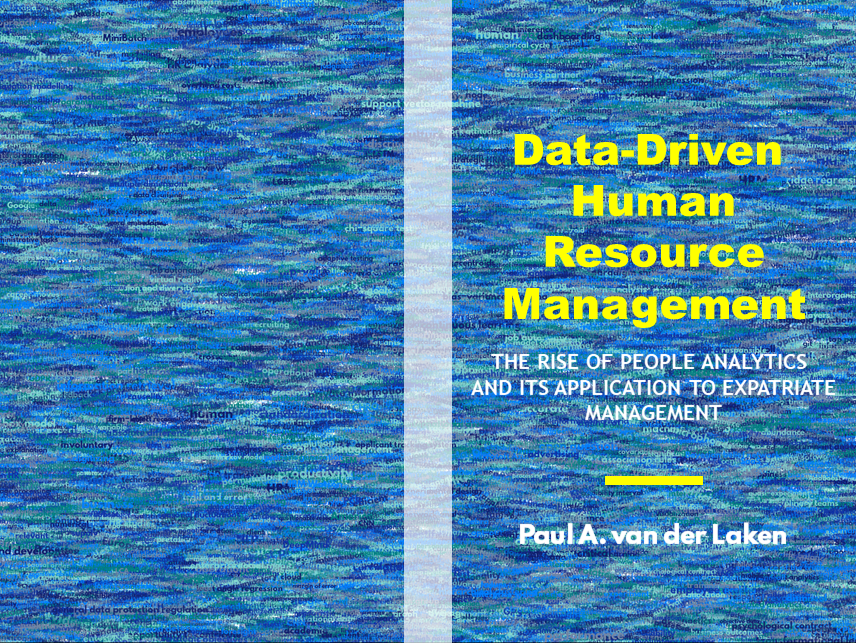
While I still need to decide on the final details regarding title placement and other details, I suspect that the final cover will look something like below — the white stripe in the middle depicting the book’s back.

coverpaul.png

Now, for the finale, I wanted to visualize the generation process via a GIF. Thomas Lin Pedersen developed this great gganimate package, which builds on the older animation package. The package greatly simplifies creating your own GIFs, as I already discussed in this earlier blog about animated GIFs in R. Anywhere, here is the generation process, where each frame includes the first frame ^ 3.2 words:

cover_wordcloud_20-League Spartan_4.gif

If you are interested in the process, or the R code I’ve written, feel free to reach out!

I’m sharing a digital version of the dissertation online sometime around the defense date: November 9th, 2018. If you’d like a copy, you can still leave your e-mailadress in the Google Form here and I’ll make sure you’ll receive your copy in time!