Tag: decisiontree

ppsr: An R implementation of the Predictive Power Score

ppsr: An R implementation of the Predictive Power Score

Update March, 2021: My R package for the predictive power score (ppsr) is live on CRAN!
Try install.packages("ppsr") in your R terminal to get the latest version.

A few months ago, I wrote about the Predictive Power Score (PPS): a handy metric to quickly explore and quantify the relationships in a dataset.

As a social scientist, I was taught to use a correlation matrix to describe the relationships in a dataset. Yet, in my opinion, the PPS provides three handy advantages:

  1. PPS works for any type of data, also nominal/categorical variables
  2. PPS quantifies non-linear relationships between variables
  3. PPS acknowledges the asymmetry of those relationships

Florian Wetschoreck came up with the PPS idea, wrote the original blog, and programmed a Python implementation of it (called ppscore).

Yet, I work mostly in R and I was very keen on incorporating this powertool into my general data science workflow.

So, over the holiday period, I did something I have never done before: I wrote an R package!

It’s called ppsr and you can find the code here on github.

Installation

# You can get the official version from CRAN:
install.packages("ppsr")

## Or you can get the development version from GitHub:
# install.packages('devtools')
# devtools::install_github('https://github.com/paulvanderlaken/ppsr')

Usage

The ppsr package has three main functions that compute PPS:

  • score() – which computes an x-y PPS
  • score_predictors() – which computes X-y PPS
  • score_matrix() – which computes X-Y PPS

Visualizing PPS

Subsequently, there are two main functions that wrap around these computational functions to help you visualize your PPS using ggplot2:

  • visualize_predictors() – producing a barplot of all X-y PPS
  • visualize_matrix() – producing a heatmap of all X-Y PPS
PPS matrix for iris

Note that Species is a nominal/categorical variable, with three character/text options.

A correlation matrix would not be able to show us that the type of iris Species can be predicted extremely well by the petal length and width, and somewhat by the sepal length and width. Yet, particularly sepal width is not easily predicted by the type of species.

Correlation matrix for iris

Exploring mtcars

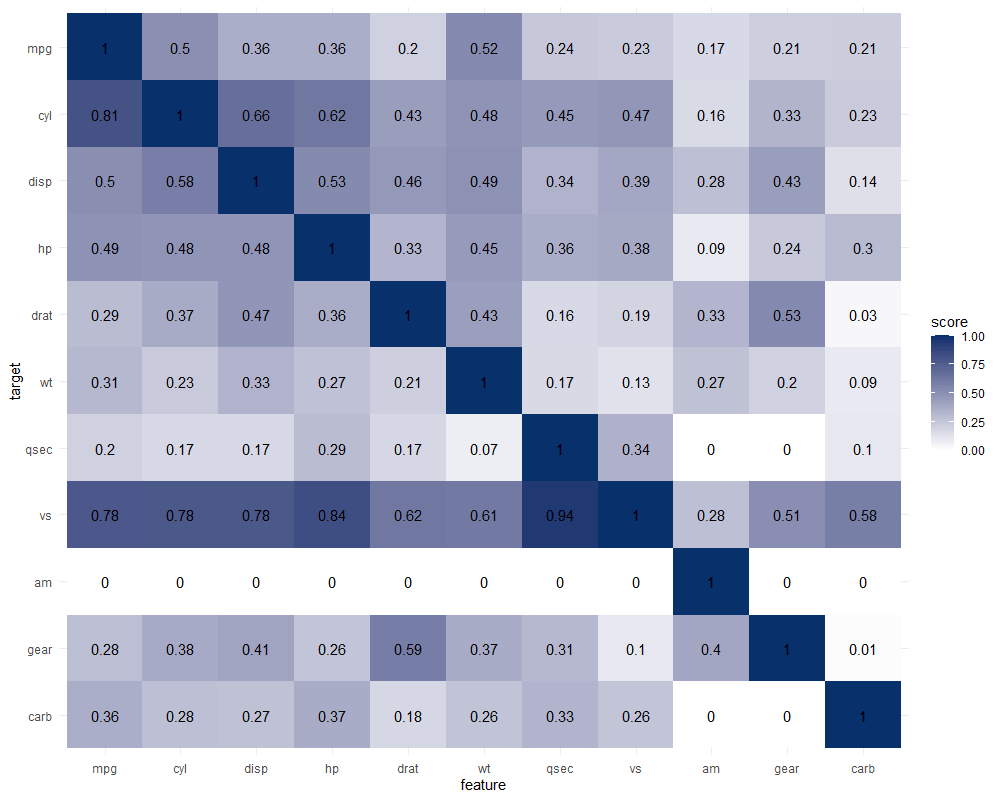
It takes about 10 seconds to run 121 decision trees with visualize_matrix(mtcars). Yet, the output is much more informative than the correlation matrix:

  • cyl can be much better predicted by mpg than the other way around
  • the classification of vs can be done well using nearly all variables as predictors, except for am
  • yet, it’s hard to predict anything based on the vs classification
  • a cars’ am can’t be predicted at all using these variables
PPS matrix for mtcars

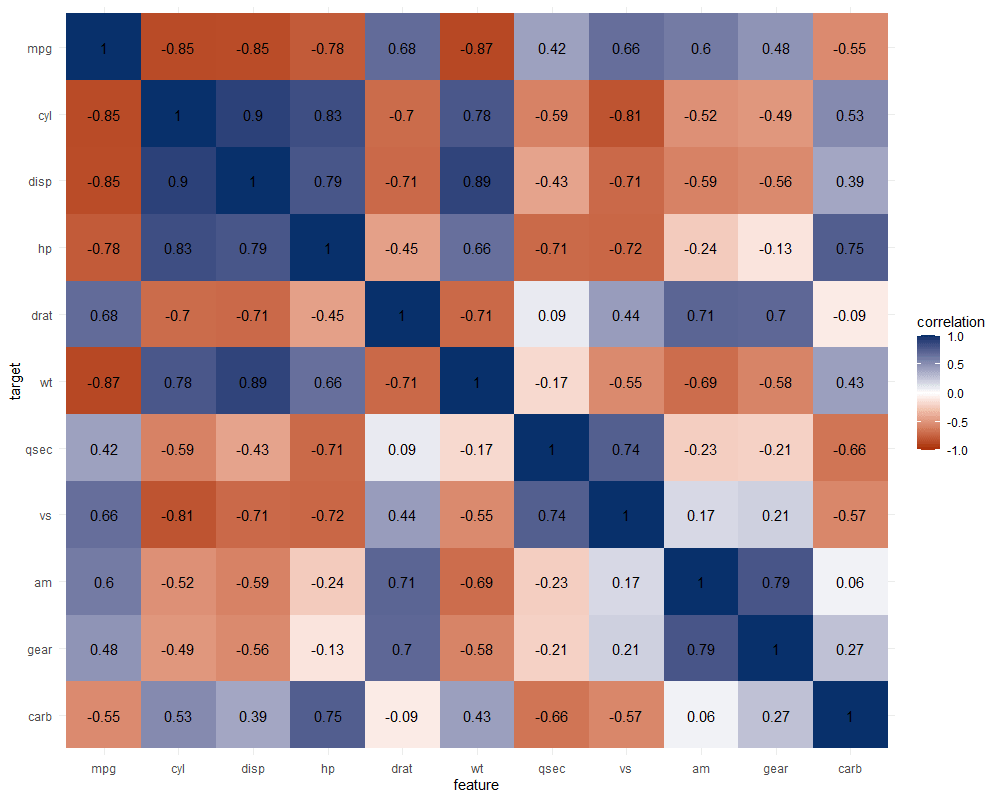
The correlation matrix does provides insights that are not provided by the PPS matrix. Most importantly, the sign and strength of any linear relationship that may exist. For instance, we can deduce that mpg relates strongly negatively with cyl.

Yet, even though half of the matrix does not provide any additional information (due to the symmetry), I still find it hard to derive the most important relations and insights at a first glance.

Moreover, the rows and columns for vs and am are not very informative in this correlation matrix as it contains pearson correlations coefficients by default, whereas vs and am are binary variables. The same can be said for cyl, gear and carb, which contain ordinal categories / integer data, so you can discuss the value of these coefficients depicted here.

Correlation matrix for mtcars

Exploring trees

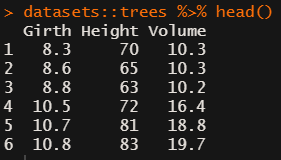
In R, there are many datasets built in via the datasets package. Let’s explore some using the ppsr::visualize_matrix() function.

datasets::trees has data on 31 trees’ girth, height and volume.

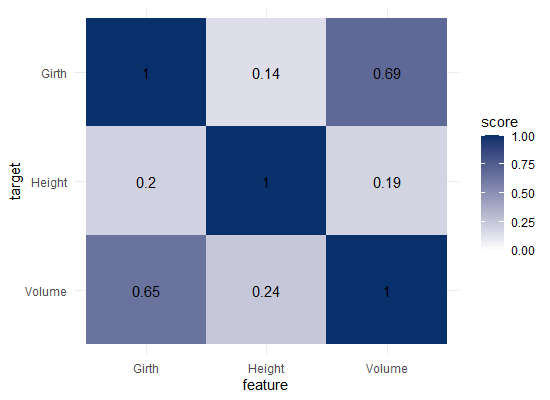
visualize_matrix(datasets::trees) shows that both girth and volume can be used to predict the other quite well, but not perfectly.

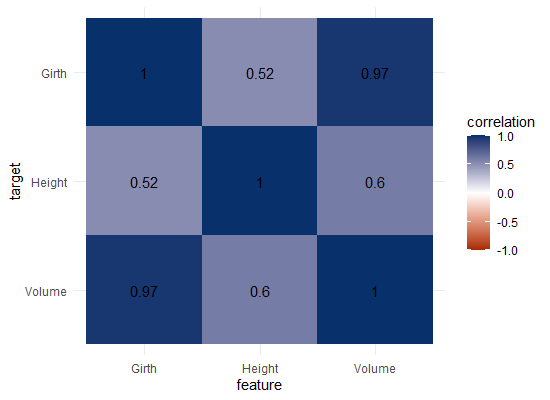
Let’s have a look at the correlation matrix.

The scores here seem quite higher in general. A near perfect correlation between volume and girth.

Is it near perfect though? Let’s have a look at the underlying data and fit a linear model to it.

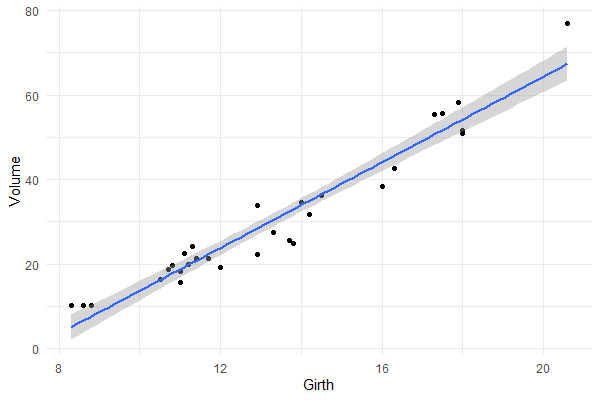
You will still be pretty far off the real values when you use a linear model based on Girth to predict Volume. This is what the original PPS of 0.65 tried to convey.

Actually, I’ve run the math for this linaer model and the RMSE is still 4.11. Using just the mean Volume as a prediction of Volume will result in 16.17 RMSE. If we map these RMSE values on a linear scale from 0 to 1, we would get the PPS of our linear model, which is about 0.75.

So, actually, the linear model is a better predictor than the decision tree that is used as a default in the ppsr package. That was used to generate the PPS matrix above.

Yet, the linear model definitely does not provide a perfect prediction, even though the correlation may be near perfect.

Conclusion

In sum, I feel using the general idea behind PPS can be very useful for data exploration.

Particularly in more data science / machine learning type of projects. The PPS can provide a quick survey of which targets can be predicted using which features, potentially with more complex than just linear patterns.

Yet, the old-school correlation matrix also still provides unique and valuable insights that the PPS matrix does not. So I do not consider the PPS so much an alternative, as much as a complement in the toolkit of the data scientist & researcher.

Enjoy the R package, or the Python module for that matter, and let me know if you see any improvements!

Visualizing decision tree partition and decision boundaries

Visualizing decision tree partition and decision boundaries

Grant McDermott developed this new R package I wish I had thought of: parttree

parttree includes a set of simple functions for visualizing decision tree partitions in R with ggplot2. The package is not yet on CRAN, but can be installed from GitHub using:

# install.packages("remotes")
remotes::install_github("grantmcdermott/parttree")

Using the familiar ggplot2 syntax, we can simply add decision tree boundaries to a plot of our data.

In this example from his Github page, Grant trains a decision tree on the famous Titanic data using the parsnip package. And then visualizes the resulting partition / decision boundaries using the simple function geom_parttree()

library(parsnip)
library(titanic) ## Just for a different data set
set.seed(123) ## For consistent jitter
titanic_train$Survived = as.factor(titanic_train$Survived)
## Build our tree using parsnip (but with rpart as the model engine)
ti_tree =
  decision_tree() %>%
  set_engine("rpart") %>%
  set_mode("classification") %>%
  fit(Survived ~ Pclass + Age, data = titanic_train)
## Plot the data and model partitions
titanic_train %>%
  ggplot(aes(x=Pclass, y=Age)) +
  geom_jitter(aes(col=Survived), alpha=0.7) +
  geom_parttree(data = ti_tree, aes(fill=Survived), alpha = 0.1) +
  theme_minimal()

Super awesome!

This visualization precisely shows where the trained decision tree thinks it should predict that the passengers of the Titanic would have survived (blue regions) or not (red), based on their age and passenger class (Pclass).

This will be super helpful if you need to explain to yourself, your team, or your stakeholders how you model works. Currently, only rpart decision trees are supported, but I am very much hoping that Grant continues building this functionality!

Animated Machine Learning Classifiers

Animated Machine Learning Classifiers

Ryan Holbrook made awesome animated GIFs in R of several classifiers learning a decision rule boundary between two classes. Basically, what you see is a machine learning model in action, learning how to distinguish data of two classes, say cats and dogs, using some X and Y variables.

These visuals can be great to understand these algorithms, the models, and their learning process a bit better.

Here’s the original tweet, with the logistic regression animation. If you follow it, you will find a whole thread of classifier GIFs. These I extracted, pasted, and explained below.

Below is the GIF which I extracted using EZgif.com.

What you see is observations from two classes, say cats and dogs, each represented using colored dots. The dots are placed along X and Y axes, which represent variables about the observations. Their tail lengths and their hairyness, for instance.

Now there’s an optimal way to seperate these classes, which is the dashed line. That line best seperates the cats from the dogs based on these two variables X and Y. As this is an optimal boundary given this data, it is stable, it does not change.

However, there’s also a solid black line, which does change. This line represents the learned boundary by the machine learning model, in this case using logistic regression. As the model is shown more data, it learns, and the boundary is updated. This learned boundary represents the best line with which the model has learned to seperate cats from dogs.

Anything above the boundary is predicted to be class 1, a dog. Everything below predicted to be class 2, a cat. As logistic regression results in a linear model, the seperation boundary is very much linear/straight.

Logistic regression gif by Ryan Holbrook

These animations are great to get a sense of how the models come to their boundaries in the back-end.

For instance, other machine learning models are able to use non-linear boundaries to dinstinguish classes, such as this quadratic discriminant analysis (qda). This “learned” boundary is much closer to the optimal boundary:

Quadratic discriminant analysis gif by Ryan Holbrook

Models using multivariate adaptive regression splines (or MARS) seem to result in multiple linear boundaries pasted together:

Multivariate adaptive regression splines gif by Ryan Holbrook

Next, we have the k-nearest neighbors algorithm, which predicts for each point (animal) the class (cat/dog) based on the “k” points closest to it. As you see, this results in a highly fluctuating, localized boundary.

K-nearest neighbors gif by Ryan Holbrook

Now, Ryan decided to push the challenge, and simulate new data for two classes with a more difficult decision boundary. The new data and optimal boundaries look like this:

The optimal decision boundary.
Via https://mathformachines.com/posts/decision/

On these data, Ryan put a whole range of non-linear models to work.

Like this support-vector machine, which tries to create optimal boundaries built of support vectors around all the cats and all the dohs (this is definitely not a technical, error-free explanation of what’s happening here).

Support vector machine gif by Ryan Holbrook

Generalized additive models are also cool to see in action. Why Ryan’s versions render so slowly, I don’t know. To learn more about GAMs, I strongly advise this tutorial here.

Generalized additive model gif by Ryan Holbrook

Let’s jump into some tree-based algorithms and the resulting models. A decision tree classifies data based on multiple, sequential, binary splits. Here, Ryan trained a simple decision tree:

Decision tree gif by Ryan Holbrook

As well as it’s big brother, a random forest, which uses hundreds of trees in the back end and thus results in a more flexible boundary:

Random forest gif by Ryan Holbrook

Extreme gradient boosting is also a tree-based algorithm, which leverages many machine learning techniques to optimize the bias-variance tradeoff. Here’s an earlier blog on how to get started with Xgboost in Python or R:

Extreme gradient boosting gif by Ryan Holbrook

Finally, a machine learning project is not complete without an artificial neural network. Learn more on these here:

Artificial neural network gif by Ryan Holbrook

If you want to know more about this project of Ryan Holbrook, do have a look at his accompanying blog here. You can also find Ryan’s code here on github.

Light GBM vs. XGBOOST in Python & R

XGBOOST stands for eXtreme Gradient Boosting. A big brother of the earlier AdaBoost, XGB is a supervised learning algorithm that uses an ensemble of adaptively boosted decision trees. For those unfamiliar with adaptive boosting algorithms, here’s a 2-minute explanation video and a written tutorial. Although XGBOOST often performs well in predictive tasks, the training process can be quite time-consuming (similar to other bagging/boosting algorithms (e.g., random forest)).

In a recent blog, Analytics Vidhya compares the inner workings as well as the predictive accuracy of the XGBOOST algorithm to an upcoming boosting algorithm: Light GBM. The blog demonstrates a stepwise implementation of both algorithms in Python. The table below reflects the main conclusion of the comparison: Although the algorithms are comparable in terms of their predictive performance, light GBM is much faster to train. With continuously increasing data volumes, light GBM, therefore, seems the way forward.

Laurae also benchmarked lightGBM against xgboost on a Bosch dataset and her results show that, on average, LightGBM (binning) is between 11x to 15x faster than xgboost (without binning):

View interactively online: https://plot.ly/~Laurae/9/

However, the differences get smaller as more threads are used due to thread inefficiencies (idle-time increases because threads are not scheduled a next task fast enough).

Light GBM is also available in R:

devtools::install_github("Microsoft/LightGBM", subdir = "R-package")

Neil Schneider tested the three algorithms for gradient boosting in R (GBM, xgboost, and lightGBM) and sums up their (dis)advantages:

  • GBM has no specific advantages but its disadvantages include no early stopping, slower training and decreased accuracy,
  • xgboost has demonstrated successful on kaggle and though traditionally slower than lightGBM, tree_method = 'hist' (histogram binning) provides a significant improvement.
  • lightGBM has the advantages of training efficiency, low memory usage, high accuracy, parallel learning, corporate support, and scale-ability. However, its’ newness is its main disadvantage because there is little community support.