Tag: networkanalysis

Simulating data with Bayesian networks, by Daniel Oehm

Simulating data with Bayesian networks, by Daniel Oehm

Daniel Oehm wrote this interesting blog about how to simulate realistic data using a Bayesian network.

Bayesian networks are a type of probabilistic graphical model that uses Bayesian inference for probability computations. Bayesian networks aim to model conditional dependence, and therefore causation, by representing conditional dependence by edges in a directed graph. Through these relationships, one can efficiently conduct inference on the random variables in the graph through the use of factors.

Devin Soni via Medium

As Bayes nets represent data as a probabilistic graph, it is very easy to use that structure to simulate new data that demonstrate the realistic patterns of the underlying causal system. Daniel’s post shows how to do this with bnlearn.

Daniel’s example Bayes net

New data is simulated from a Bayes net (see above) by first sampling from each of the root nodes, in this case sex. Then followed by the children conditional on their parent(s) (e.g. sport | sex and hg | sex) until data for all nodes has been drawn. The numbers on the nodes below indicate the sequence in which the data is simulated, noting that rcc is the terminal node.

Daniel Oehms in his blog

The original and simulated datasets are compared in a couple of ways 1) observing the distributions of the variables 2) comparing the output from various models and 3) comparing conditional probability queries. The third test is more of a sanity check. If the data is generated from the original Bayes net then a new one fit on the simulated data should be approximately the same. The more rows we generate the closer the parameters will be to the original values.

The original data alongside the generated data in Daniel’s example

As you can see, a Bayesian network allows you to generate data that looks, feels, and behaves a lot like the data on which you based your network on in the first place.

This can be super useful if you want to generate a synthetic / fake / artificial dataset without sharing personal or sensitive data.

Moreover, the underlying Bayesian net can be very useful to compute missing values. In Daniel’s example, he left out some values on purpose (pretending they were missing) and imputed them with the Bayes net. He found that the imputed values for the missing data points were quite close to the original ones:

For two variables, the original values plotted against the imputed replacements.

In the original blog, Daniel goes on to show how to further check the integrity of the simulated data using statistical models and shares all his code so you can try this out yourself. Please do give his website a visit as Daniel has many more interesting statistics blogs!

Interactive Explanation of Network and Graph Principles

Interactive Explanation of Network and Graph Principles

Why do groups of people act smart, dumb, kind, or cruel? People behave in strange ways, particularly when they are able to influence one another. Both good and bad things can happen when people interact and behave in network structures. On the bright side, you must be familiar with the wisdom of the crowd, where the aggregated knowledge of a group is more valuable than its sum? Ensemble algorithms – like random forest analysis – rely on this positive principle.

On the dark side, are you familiar with the phenomenon called the tragedy of the commons, where shared resource-systems collapse because individuals behave in their self-interest? Or psychological phenomena such as groupthink, where groups of people make irrational decisions due to social issues? The recent spread of fake news and misinformation is also stimulated by network interactions. In these cases, we could speak of the madness of the crowd.

Nicky Case made a great interactive walkthrough explaining why and when networks of people become wise or mad. You are tasked to change and simulate network interactions while Nicky explains concepts such as (complex) contagion, the majority illusion paradox, bonding and bridging, and small world networks. In the references, Nicky provides links to scientific papers explaining these concepts in more detail. I highly suggest you check out her website here.


example.png
Screenshot of one of the explanations/simulations Nicky offers.


Identifying “Dirty” Twitter Bots with R and Python

Past week, I came across two programming initiatives to uncover Twitter bots and one attempt to identify fake Instagram accounts.

Mike Kearney developed the R package botornot which applies machine learning to estimate the probability that a Twitter user is a bot. His default model is a gradient boosted model trained using both users-level (bio, location, number of followers and friends, etc.) and tweets-level information (number of hashtags, mentions, capital letters, etc.). This model is 93.53% accurate when classifying bots and 95.32% accurate when classifying non-bots. His faster model uses only the user-level data and is 91.78% accurate when classifying bots and 92.61% accurate when classifying non-bots. Unfortunately, the models did not classify my account correctly (see below), but you should definitely test yourself and your friends via this Shiny application.

Fun fact: botornot can be integrated with Mike’s rtweet package

Scraping Dirty Bots

At around the same time, I read this very interesting blog by Andy Patel. Annoyed by the fake Twitter accounts that kept liking and sharing his tweets, Andy wrote a Python script called pronbot_search. It’s an iterative search algorithm which Andy seeded with the dozen fake Twitter accounts that he identified originally. Subsequently, the program iterated over the friends and followers of each of these fake users, looking for other accounts displaying similar traits (e.g., similar description, including an URL to a sex-website called “Dirty Tinder”).

Whenever a new account was discovered, it was added to the query list, and the process continued. Because of the Twitter API restrictions, the whole crawling process took literal days before Andy manually terminated it. The results are just amazing:

After a day, the results looked like so. Notice the weird clusters of relationships in this network. [original]
The full bot network uncovered by Andy included 22.000 fake Twitter accounts:

At the end of the weekend of March 10th, Andy had to stop the scraper after running for several days even though he had only processed 18% of the networks of the 22.000 included Twitter bots [original]
The bot network on Twitter is probably enormous! Zooming in on the network, Andy notes that:

Pretty much the same pattern I’d seen after one day of crawling still existed after one week. Just a few of the clusters weren’t “flower” shaped.

Andy Patel, March 2018, link

Zoomed in to a specific part of the network you can see the separate clusters of bots doing little more than liking each others messages. [original]
In his blog, Andy continues to look at all kind of data on these fake accounts. I found most striking that many of these account are years and years old already. Potentially, Twitter can use Mike Kearney’s botornot application to spot and remove them!

Most of the bots in the Dirty Tinder network found by Andy Patel were 3 to 8 years old already. [original]
Andy was nice enough to share the data on these bot accounts here, for you to play with. His Python code is stored in the same github repo and more details around this project you can read in his original blog.

Fake Instagram Accounts

Finally, SRFdata (Timo Grossenbacher) attempted to uncover fake Instagram followers among the 7 million followers in the network of 115 important Swiss Instagram influencers in R. Magi Metrics was used to retrieve information for public Instagram accounts and rvest for private accounts. Next, clear fake accounts (e.g., little followers, following many, no posts, no profile picture, numbers in name) were labelled manually, and approximately 10% of the inspected 1000 accounts appeared fake. Finally, they trained a random forest model to classify fake accounts with a sensitivity (true negative) rate of 77.4% and an overall accuracy of around 94%.

Harry Plotter: Network analysis of spell usage

Harry Plotter: Network analysis of spell usage

Apparently, I was not the only geek who decided to celebrate the 20th anniversary of the Harry Potter saga with statistical analysis. Students Moritz Haine and Markus Dienstknecht of the Data Science for Decision Making Master at Maastricht University started their own celebratory project as part of a course Information Retrieval and Text Mining.

Students in previous years looked at for example Lord of the Rings, Star Wars and Game of Thrones. However, to our surprise, Harry Potter was missing. Since the books are about magic, we decided it would be interesting to identify all of the spells and the wizards that cast the most spells

Moritz Haine

From the books, the students extracted 41 different wizards, 64 different spells and 253 spells. Moritz points out that they could only include spoken spells, even though the most powerful wizards can also cast spells without naming them. They expect this might be the reason why Dumbledore and Voldemort are not ranked as high. At the end of their project, Moritz and Markus visualized their results in a spell-character mapping.

Spells
A network mapping of the characters and spells casted in the Harry Potter saga [original]
This is the latest addition to my collection of Harry Potter analyses, to which a similar, interactive web application of spell usage was added only last week.


Network Visualization with igraph and ggraph

Network Visualization with igraph and ggraph

Eiko Fried, researcher at the University of Amsterdam, recently blogged about personal collaborator networks. I came across his post on twitter, discussing how to conduct such analysis in R, and got inspired.

Unfortunately, my own publication record is quite boring to analyse, containing only a handful of papers. However, my promotors – Prof. dr. Jaap Paauwe and Prof. dr. Marc van Veldhoven – have more extensive publication lists. Although I did not manage to retrieve those using the scholarpackage, I was able to scrape Jaap Paauwe’s publication list from his Google Scholar page. Jaap has 141 publications listed with one or more citation on Google Scholar. More than enough for an analysis!

While Eiko uses his colleague Sacha Epskamp’s R package qgraph, I found an alternative in the packages igraph and ggraph.

### PAUL VAN DER LAKEN
### 2017-10-31
### COAUTHORSHIP NETWORK VISUALIZATION

# LOAD IN PACKAGES
library(readxl)
library(dplyr)
library(ggraph)
library(igraph)

# STANDARDIZE VISUALIZATIONS
w = 14
h = 7
dpi = 900

# LOAD IN DATA
pub_history <- read_excel("paauwe_wos.xlsx")

# RETRIEVE AUTHORS
pub_history %>%
  filter(condition == 1) %>%
  select(name) %>%
  .$name %>%
  gsub("[A-Z]{2,}|[A-Z][ ]", "", .) %>%
  strsplit(",") %>%
  lapply(function(x) gsub("\\..*", "", x)) %>%
  lapply(function(x) gsub("^[ ]+","",x)) %>%
  lapply(function(x) x[x != ""]) %>%
  lapply(function(x) tolower(x))->
  authors

# ADD JAAP PAAUWE WHERE MISSING
authors <- lapply(authors, function(x){
  if(!"paauwe" %in% x){
    return(c(x,"paauwe"))
  } else{
    return(x)
  }
})

# EXTRACT UNIQUE AUTHORS
authors_unique <- authors %>% unlist() %>% unique() %>% sort(F)

# FORMAT AUTHOR NAMES 
# CAPATILIZE
simpleCap <- function(x) {
  s <- strsplit(x, " ")[[1]]
  names(s) <- NULL
  paste(toupper(substring(s, 1,1)), substring(s, 2),
        sep="", collapse=" ")
}
authors_unique_names <- sapply(authors_unique, simpleCap)

The above retrieve the names of every unique author from the excel file I got from Google Scholar. Now we need to examine to what extent the author names co-occur. We do that with the below code, storing all co-occurance data in a matrix, which we then transform to an adjacency matrix igraph can deal with. The output graph data looks like this:

# CREATE COAUTHORSHIP MATRIX
coauthorMatrix <- do.call(
  cbind,
  lapply(authors, function(x){
  1*(authors_unique %in% x)
}))

# TRANSFORM TO ADJECENY MATRIX
adjacencyMatrix <- coauthorMatrix %*% t(coauthorMatrix)

# CREATE NETWORK GRAPH
g <- graph.adjacency(adjacencyMatrix, 
                     mode = "undirected", 
                     diag = FALSE)
V(g)$Degree <- degree(g, mode = 'in') # CALCULATE DEGREE
V(g)$Name <- authors_unique_names # ADD NAMES
g # print network
## IGRAPH f1b50a7 U--- 168 631 -- 
## + attr: Degree (v/n), Name (v/c)
## + edges from f1b50a7:
##  [1]  1-- 21  1--106  2-- 44  2-- 52  2--106  2--110  3-- 73  3--106
##  [9]  4-- 43  4-- 61  4-- 78  4-- 84  4--106  5-- 42  5--106  6-- 42
## [17]  6-- 42  6-- 97  6-- 97  6--106  6--106  6--125  6--125  6--127
## [25]  6--127  6--129  6--129  7--106  7--106  7--150  7--150  8-- 24
## [33]  8-- 38  8-- 79  8-- 98  8-- 99  8--106  9-- 88  9--106  9--133
## [41] 10-- 57 10--106 10--128 11-- 76 11-- 85 11--106 12-- 30 12-- 80
## [49] 12--106 12--142 12--163 13-- 16 13-- 16 13-- 22 13-- 36 13-- 36
## [57] 13--106 13--106 13--106 13--166 14-- 70 14-- 94 14--106 14--114
## + ... omitted several edges

This graph data we can now feed into ggraph:

# SET THEME FOR NETWORK VISUALIZATION
theme_networkMap <- theme(
  plot.background = element_rect(fill = "beige"),
  panel.border = element_blank(),
  panel.grid = element_blank(),
  panel.background = element_blank(),
  legend.background = element_blank(),
  legend.position = "none",
  legend.title = element_text(colour = "black"),
  legend.text = element_text(colour = "black"),
  legend.key = element_blank(),
  axis.text = element_blank(), 
  axis.title = element_blank(),
  axis.ticks = element_blank()
)
# VISUALIZE NETWORK
ggraph(g, layout = "auto") +
  # geom_edge_density() +
  geom_edge_diagonal(alpha = 1, label_colour = "blue") +
  geom_node_label(aes(label = Name, size = sqrt(Degree), fill = sqrt(Degree))) +
  theme_networkMap +
  scale_fill_gradient(high = "blue", low = "lightblue") +
  labs(title = "Coauthorship Network of Jaap Paauwe",
       subtitle = "Publications with more than one Google Scholar citation included",
       caption = "paulvanderlaken.com") +
  ggsave("Paauwe_Coauthorship_Network.png", dpi = dpi, width = w, height = h)

Paauwe_Coauthorship_Network

Feel free to use the code to look at your own coauthorship networks or to share this further.

Networks Among #rstats Twitterers

Networks Among #rstats Twitterers

Reposted from Kasia Kulma’s github with minor modifications.

Have you ever wondered whether the most active/popular R-twitterers are virtual friends? 🙂 And by friends here I simply mean mutual followers on Twitter. In this post, I score and pick top 30 #rstats twitter users and analyse their Twitter network. You’ll see a lot of applications of rtweet and ggraph packages, as well as a very useful twist using purrr library, so let’s begin!


IMPORTING #RSTATS USERS

After loading my precious packages…

library(rtweet)
library(dplyr)
library(purrr)
library(igraph)
library(ggraph)

… I searched for Twitter users that have rstats termin their profile description. It definitely doesn’t include ALL active and popular R – users, but it’s a pretty reliable way of picking R – fans.

r_users <- search_users("#rstats", n = 1000)

It’s important to say, that in rtweet::search_users() even if you specify 1000 users to be extracted, you end up with quite a few duplicates and the actual number of users I got was much smaller: 564

r_users %>% summarise(n_users = n_distinct(screen_name))
##   n_users
## 1     564

Funnily enough, even though my profile description contains #rstats I was not included in the search results (@KKulma), sic! Were you? 🙂

SCORING AND CHOOSING TOP #RSTATS USERS

Now, let’s extract some useful information about those users:

r_users_info <- lookup_users(r_users$screen_name)

You’ll notice, that created data frame holds information about the number of followers, friends (users they follow), lists they belong to, the number of tweets (statuses) or how many times were they marked favourite.

r_users_info %>% select(dplyr::contains("count")) %>% head()
##   followers_count friends_count listed_count favourites_count
## 1            8311           366          580             9325
## 2           44474            11         1298                3
## 3           11106           524          467            18495
## 4           12481           431          542             7222
## 5           15345          1872          680            27971
## 6            5122           700          549             2796
##   statuses_count
## 1          66117
## 2           1700
## 3           8853
## 4           6388
## 5          22194
## 6          10010

And these variables that I used for building my ‘top score’: I simply calculate a percentile for each of those variables and sum it all together for each user. Given that each variable’s percentile will give me a value between 0 and 1, The final score can have a maximum value of 5.

r_users_ranking <- r_users_info %>%
  filter(protected == FALSE) %>% 
  select(screen_name, dplyr::contains("count")) %>% 
  unique() %>% 
  mutate(followers_percentile = ecdf(followers_count)(followers_count),
         friends_percentile = ecdf(friends_count)(friends_count),
         listed_percentile = ecdf(listed_count)(listed_count),
         favourites_percentile = ecdf(favourites_count)(favourites_count),
         statuses_percentile = ecdf(statuses_count)(statuses_count)
         ) %>% 
  group_by(screen_name) %>% 
  summarise(top_score = followers_percentile + friends_percentile + listed_percentile + favourites_percentile + statuses_percentile) %>% 
  ungroup() %>% 
  mutate(ranking = rank(-top_score))

Finally, I picked top 30 users based on the score I calculated. Tada!

top_30 <- r_users_ranking %>% arrange(desc(top_score)) %>% head(30) %>% arrange(desc(top_score))
top_30 
## # A tibble: 30 x 3
##        screen_name top_score ranking
##              <chr>     <dbl>   <dbl>
##  1          hspter  4.877005       1
##  2    RallidaeRule  4.839572       2
##  3         DEJPett  4.771836       3
##  4 modernscientist  4.752228       4
##  5 nicoleradziwill  4.700535       5
##  6      tomhouslay  4.684492       6
##  7    ChetanChawla  4.639929       7
##  8   TheSmartJokes  4.627451       8
##  9   Physical_Prep  4.625668       9
## 10       Cataranea  4.602496      10
## # ... with 20 more rows

I must say I’m incredibly impressed by these scores: @hpster, THE top R – twitterer managed to obtain a score of nearly 4.9 out of 5! WOW!

Anyway! To add some more depth to my list, I tried to identify top users’ gender, to see how many of them are women. I had to do it manually (ekhem!), as the Twitter API’s data doesn’t provide this, AFAIK. Let me know if you spot any mistakes!

top30_lookup <- r_users_info %>%
  filter(screen_name %in% top_30$screen_name) %>% 
  select(screen_name, user_id)

top30_lookup$gender <- c("M", "F", "F", "F", "F",
                         "M", "M", "M", "F", "F", 
                         "F", "M", "M", "M", "F", 
                         "F", "M", "M", "M", "M", 
                         "M", "M", "M", "F", "M",
                         "M", "M", "M", "M", "M")

table(top30_lookup$gender)
## 
##  F  M 
## 10 20

It looks like a third of all top users are women, but in the top 10 users, there are 6 women. Better than I expected, to be honest. So, well done, ladies!

GETTING FRIENDS NETWORK

Now, this was the trickiest part of this project: extracting top users’ friends list and putting it all in one data frame. As you may be aware, Twitter API allows you to download information only on 15 accounts in 15 minutes. So for my list, I had to break it up into 2 steps, 15 users each and then I named each list according to the top user they refer to:

top_30_usernames <- top30_lookup$screen_name

friends_top30a <-   map(top_30_usernames[1:15 ], get_friends)
names(friends_top30a) <- top_30_usernames[1:15]

# 15 minutes later....
friends_top30b <- map(top_30_usernames[16:30], get_friends)

After this I end up with two lists, each containing all friends’ IDs for top and bottom 15 users respectively. So what I need to do now is i) append the two lists, ii) create a variable stating top users’ name in each of those lists and iii) turn lists into data frames. All this can be done in 3 lines of code. And brace yourself: here comes the purrr trick I’ve been going on about! Simply using purrr:::map2_df I can take a single list of lists, create a name variable in each of those lists based on the list name (twitter_top_user) and convert the result into the data frame. BRILLIANT!!

# turning lists into data frames and putting them together
friends_top30 <- append(friends_top30a, friends_top30b)
names(friends_top30) <- top_30_usernames

# purrr - trick I've been banging on about!
friends_top <- map2_df(friends_top30, names(friends_top30), ~ mutate(.x, twitter_top_user = .y)) %>% 
  rename(friend_id = user_id) %>% select(twitter_top_user, friend_id)

Here’s the last bit that I need to correct before we move on to plotting the friends networks: for some reason, using purrr::map() with rtweet:::get_friends() gives me max only 5000 friends, but in case of @TheSmartJokes the true value is over 8000. As it’s the only top user with more than 5000 friends, I’ll download his friends separately…

# getting a full list of friends
SJ1 <- get_friends("TheSmartJokes")
SJ2 <- get_friends("TheSmartJokes", page = next_cursor(SJ1))

# putting the data frames together 
SJ_friends <-rbind(SJ1, SJ2) %>%  
  rename(friend_id = user_id) %>% 
  mutate(twitter_top_user = "TheSmartJokes") %>% 
  select(twitter_top_user, friend_id)

# the final results - over 8000 friends, rather than 5000
str(SJ_friends) 
## 'data.frame':    8611 obs. of  2 variables:
##  $ twitter_top_user: chr  "TheSmartJokes" "TheSmartJokes" "TheSmartJokes" "TheSmartJokes" ...
##  $ friend_id       : chr  "390877754" "6085962" "88540151" "108186743" ...

… and use it to replace those friends that are already in the final friends list.

friends_top30 <- friends_top %>% 
  filter(twitter_top_user != "TheSmartJokes") %>% 
  rbind(SJ_friends) 

Finally, let me do some last data cleaning: filtering out friends that are not among the top 30 R – users, replacing their IDs with twitter names and adding gender for top users and their friends… Tam, tam, tam: here we are! Here’s the final data frame we’ll use for visualising the friend networks!

# select friends that are top30 users
final_friends_top30 <- friends_top  %>% 
  filter(friend_id %in% top30_lookup$user_id)

# add friends' screen_name
final_friends_top30$friend_name <- top30_lookup$screen_name[match(final_friends_top30$friend_id, top30_lookup$user_id)]

# add users' and friends' gender
final_friends_top30$user_gender <- top30_lookup$gender[match(final_friends_top30$twitter_top_user, top30_lookup$screen_name)]
final_friends_top30$friend_gender <- top30_lookup$gender[match(final_friends_top30$friend_name, top30_lookup$screen_name)]

## final product!!!
final <- final_friends_top30 %>% select(-friend_id)

head(final)
##   twitter_top_user     friend_name user_gender friend_gender
## 1         hrbrmstr nicoleradziwill           M             F
## 2         hrbrmstr        kara_woo           M             F
## 3         hrbrmstr      juliasilge           M             F
## 4         hrbrmstr        noamross           M             M
## 5         hrbrmstr      JennyBryan           M             F
## 6         hrbrmstr     thosjleeper           M             M

VISUALIZING FRIENDS NETWORKS

After turning our data frame into something more usable by igraph and ggraph

f1 <- graph_from_data_frame(final, directed = TRUE, vertices = NULL)
V(f1)$Popularity <- degree(f1, mode = 'in')

… let’s have a quick overview of all the connections:

ggraph(f1, layout='kk') + 
  geom_edge_fan(aes(alpha = ..index..), show.legend = FALSE) +
  geom_node_point(aes(size = Popularity)) +
  theme_graph( fg_text_colour = 'black') 

generic_pure

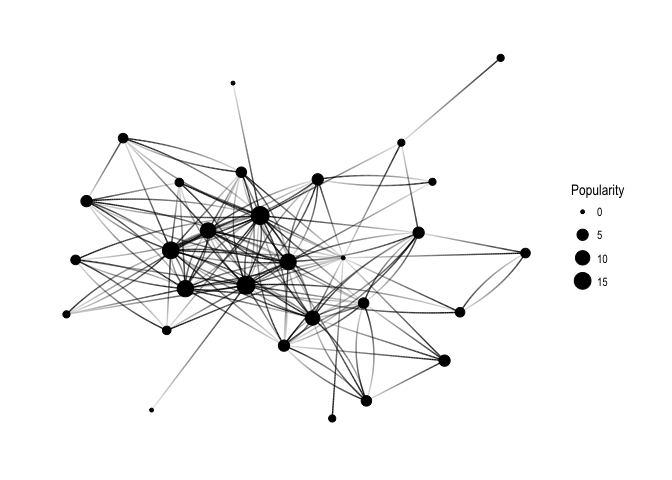
Keep in mind that Popularity – defined as the number of edges that go into the node – determines node size. It’s all very pretty, but I’d like to see how nodes correspond to Twitter users’ names:

ggraph(f1, layout='kk') + 
  geom_edge_fan(aes(alpha = ..index..), show.legend = FALSE) +
  geom_node_point(aes(size = Popularity)) +
  geom_node_text(aes(label = name, fontface='bold'), 
                 color = 'white', size = 3) +
  theme_graph(background = 'dimgray', text_colour = 'white',title_size = 30) 

generic_names

So interesting! You can see the core of the graph consists mainly of female users: @hpster, @JennyBryan, @juliasilge, @karawoo, but also a couple of male R – users: @hrbrmstr and @noamross. Who do they follow? Men or women?

ggraph(f1, layout='kk') + 
  geom_edge_fan(aes(alpha = ..index..), show.legend = FALSE) +
  geom_node_point(aes(size = Popularity)) +
  theme_graph( fg_text_colour = 'black') +
  geom_edge_link(aes(colour = friend_gender)) +
  scale_edge_color_brewer(palette = 'Set1') + 
  labs(title='Top 30 #rstats users and gender of their friends')

generic_with_gender

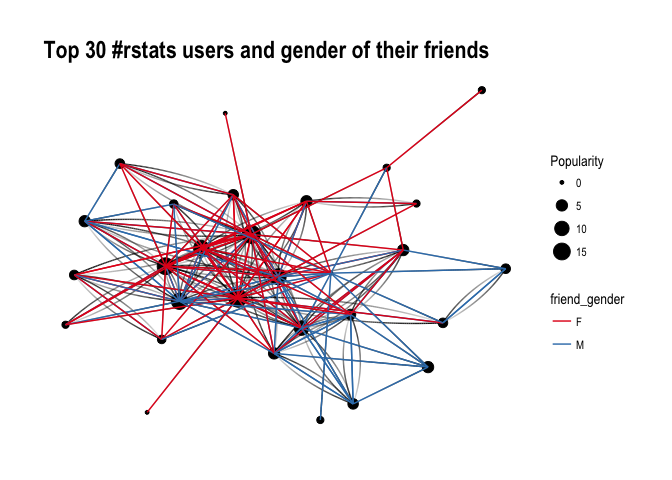
It’s difficult to say definitely, but superficially I see A LOT of red, suggesting that our top R – users often follow female top twitterers. Let’s have a closer look and split graphs by user gender and see if there’s any difference in the gender of users they follow:

ggraph(f1, layout='kk') + 
  geom_edge_fan(aes(alpha = ..index..), show.legend = FALSE) +
  geom_node_point(aes(size = Popularity)) +
  theme_graph( fg_text_colour = 'black') +
  facet_edges(~user_gender) +
  geom_edge_link(aes(colour = friend_gender)) +
  scale_edge_color_brewer(palette = 'Set1') +
  labs(title='Top 30 #rstats users and gender of their friends', subtitle='Graphs are separated by top user gender, edge colour indicates their friend gender' )

gender_with_gender

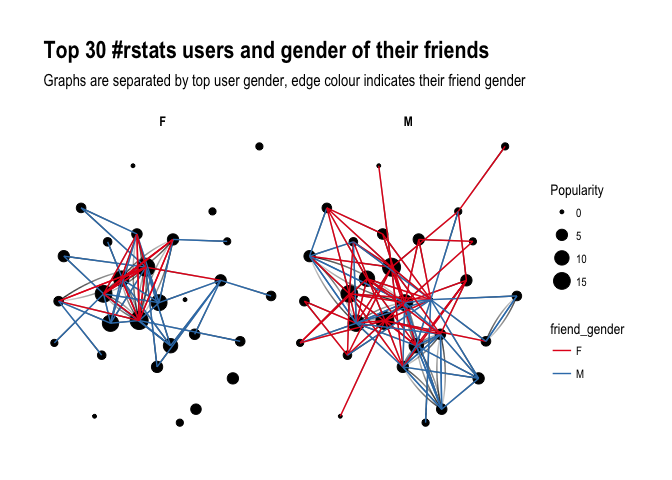
Ha! look at this! Obviously, female users’ graph will be less dense as there are fewer of them in the dataset, however, you can see that they tend to follow male users more often than male top users do. Is that impression supported by raw numbers?

final %>% 
  group_by(user_gender, friend_gender) %>% 
  summarize(n = n()) %>% 
  group_by(user_gender) %>% 
  mutate(sum = sum(n),
         percent = round(n/sum, 2)) 
## # A tibble: 4 x 5
## # Groups:   user_gender [2]
##   user_gender friend_gender     n   sum percent
##         <chr>         <chr> <int> <int>   <dbl>
## 1           F             F    26    57    0.46
## 2           F             M    31    57    0.54
## 3           M             F    55   101    0.54
## 4           M             M    46   101    0.46

It seems so, although to the lesser extent than suggested by the network graphs: Female top users follow other female top users 46% of the time, whereas male top users follow female top user 54% of the time. So what do you have to say about that?

About the author:

Kasia Kulma states she’s an overall, enthusiastic science enthusiast. Formally, a doctor in evolutionary biology, professionally, a data scientist, and, privately, a soppy mum and outdoors lover.