Tag: datavisualization

Animated vs. Static Data Visualizations

Animated vs. Static Data Visualizations

GIFs or animations are rising quickly in the data visualization world (see for instance here).

However, in my personal experience, they are not as widely used in business settings. You might even say animations are frowned by, for instance, LinkedIn, which removed the option to even post GIFs on their platform!

Nevertheless, animations can be pretty useful sometimes. For instance, they can display what happens during a process, like a analytical model converging, which can be useful for didactic purposes. Alternatively, they can be great for showing or highlighting trends over time.  

I am curious what you think are the pro’s and con’s of animations. Below, I posted two visualizations of the same data. The data consists of the simulated workforce trends, including new hires and employee attrition over the course of twelve months. 
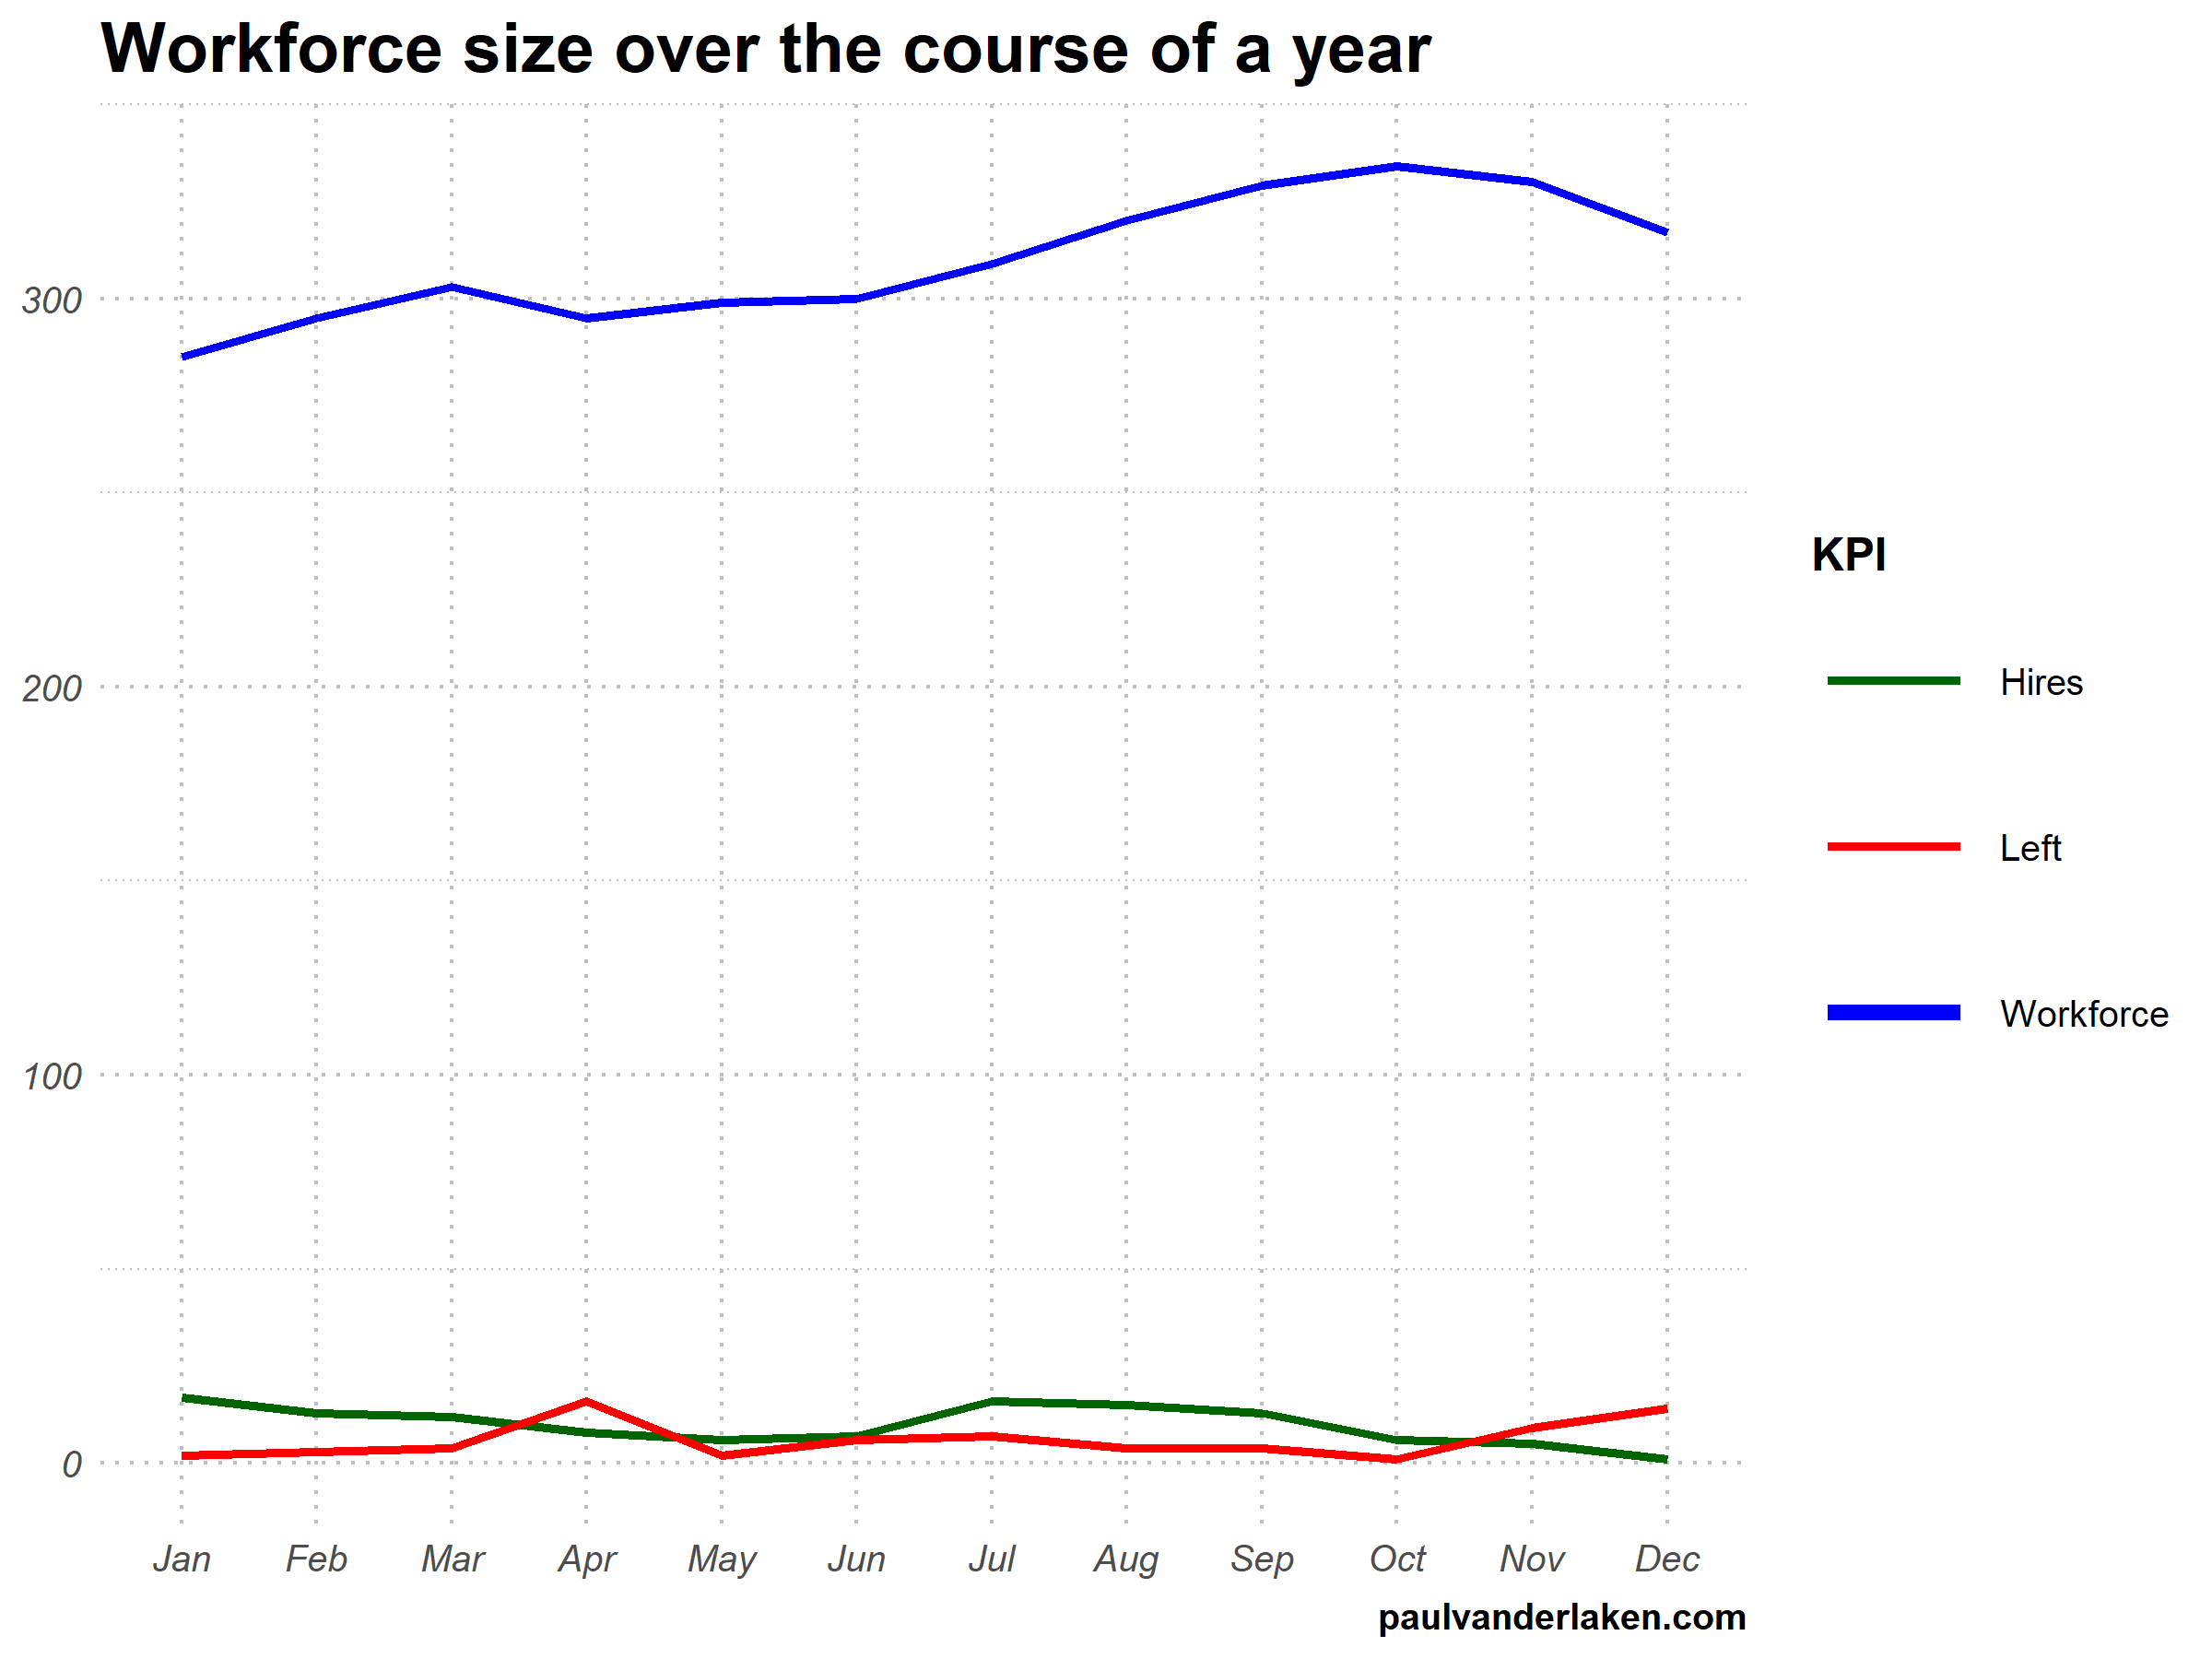
versus

Would you prefer the static, or the animated version? Please do share your thoughts in the comments below, or on the respective LinkedIn and Twitter posts!


Want to reproduce these plots? Or play with the data? Here’s the R code:

# LOAD IN PACKAGES ####
# install.packages('devtools')
# devtools::install_github('thomasp85/gganimate')
library(tidyverse)
library(gganimate)
library(here)


# SET CONSTANTS ####
# data
HEADCOUNT = 270
HIRE_RATE = 0.12
HIRE_ADDED_SEASONALITY = rep(floor(seq(14, 0, length.out = 6)), 2)
LEAVER_RATE = 0.16
LEAVER_ADDED_SEASONALITY = c(rep(0, 3), 10, rep(0, 6), 7, 12)

# plot
TEXT_SIZE = 12
LINE_SIZE1 = 2
LINE_SIZE2 = 1.1
COLORS = c("darkgreen", "red", "blue")

# saving
PLOT_WIDTH = 8
PLOT_HEIGHT = 6
FRAMES_PER_POINT = 5


# HELPER FUNCTIONS ####
capitalize_string = function(text_string){
paste0(toupper(substring(text_string, 1, 1)), substring(text_string, 2, nchar(text_string)))
}


# SIMULATE WORKFORCE DATA ####
set.seed(1)

# generate random leavers and some seasonality
leavers <- rbinom(length(month.abb), HEADCOUNT, TURNOVER_RATE / length(month.abb)) + LEAVER_ADDED_SEASONALITY

# generate random hires and some seasonality
joiners <- rbinom(length(month.abb), HEADCOUNT, HIRE_RATE / length(month.abb)) + HIRE_ADDED_SEASONALITY

# combine in dataframe
data.frame(
month = factor(month.abb, levels = month.abb, ordered = TRUE)
, workforce = HEADCOUNT - cumsum(leavers) + cumsum(joiners)
, left = leavers
, hires = joiners
) ->
wf

# transform to long format
wf_long <- gather(wf, key = "variable", value = "value", -month)
capitalize the name of variables
wf_long$variable <- capitalize_string(wf_long$variable)


# VISUALIZE & ANIMATE ####
# draw workforce plot
ggplot(wf_long, aes(x = month, y = value, group = variable)) +
geom_line(aes(col = variable, size = variable == "workforce")) +
scale_color_manual(values = COLORS) +
scale_size_manual(values = c(LINE_SIZE2, LINE_SIZE1), guide = FALSE) +
guides(color = guide_legend(override.aes = list(size = c(rep(LINE_SIZE2, 2), LINE_SIZE1)))) +
# theme_PVDL() +
labs(x = NULL, y = NULL, color = "KPI", caption = "paulvanderlaken.com") +
ggtitle("Workforce size over the course of a year") +
NULL ->
workforce_plot

# ggsave(here("workforce_plot.png"), workforce_plot, dpi = 300, width = PLOT_WIDTH, height = PLOT_HEIGHT)

# animate the plot
workforce_plot +
geom_segment(aes(xend = 12, yend = value), linetype = 2, colour = 'grey') +
geom_label(aes(x = 12.5, label = paste(variable, value), col = variable),
hjust = 0, size = 5) +
transition_reveal(variable, along = as.numeric(month)) +
enter_grow() +
coord_cartesian(clip = 'off') +
theme(
plot.margin = margin(5.5, 100, 11, 5.5)
, legend.position = "none"
) ->
animated_workforce

anim_save(here("workforce_animation.gif"),
animate(animated_workforce, nframes = nrow(wf) * FRAMES_PER_POINT,
width = PLOT_WIDTH, height = PLOT_HEIGHT, units = "in", res = 300))

Data Visualization Tools & Resources

There’s this amazing overview of helpful dataviz resources atwww.visualisingdata.com/resources!

Browse through hundreds of helpful data visualization tools, programs, and services. All neatly organized by Andy Kirk in categories: data handling, applications, programming, web-based, qualitative, mapping, specialist, and colour. What a great repository!

A snapshot of www.visualisingdata.com/resource

Looking for expert books on data visualization?
Have a look at these recommendations!

dygraphs

dygraphs

Today I learned about dygraphs, a fast, flexible open source JavaScript charting library. As everything in JavaScript, the charts produced by dygraphs integrate completely in the webbrowser and are thus very functional and interactive. See, for instance, the below where the graph highlights the y-axis value for both time series in the graph based on the x-axis value of my mouse location (January 24 2009). Very cool!

1.png

While I am no JS hero, the webpage includes a dypgrahs tutorial, as well as a playground environment.

Fortunately, I do know my way around R, and of course someone had already integrated dypgrahs in R in the form of the dygraphs R package. It works like a charm!

install.packages("dygraphs")
library("dygraphs")

dygraph(AirPassengers)

Also in R, your dygraphs are fully interactive, with my mouse hoevering over June 1951 in the below example.

2.PNG

And you can add all kinds of cool elements and modifications to the graphs, such as for instance a range selector:

dygraph(AirPassengers) %>% dyRangeSelector()

3.PNG

For the full range of visualization options dygraphs offers in R, please do have a look at the official RStudio page.

Visualizing model uncertainty

Visualizing model uncertainty

ungeviz is a new R package by Claus Wilke, whom you may know from his amazing work and books on Data Visualization. The package name comes from the German word “Ungewissheit”, which means uncertainty. You can install the developmental version via:

devtools::install_github("clauswilke/ungeviz")

The package includes some bootstrapping functionality that, when combined with ggplot2 and gganimate, can produce some seriousy powerful visualizations. For instance, take the below piece of code:

data(BlueJays, package = "Stat2Data")

# set up bootstrapping object that generates 20 bootstraps
# and groups by variable `KnownSex`
bs <- ungeviz::bootstrapper(20, KnownSex)

ggplot(BlueJays, aes(BillLength, Head, color = KnownSex)) +
  geom_smooth(method = "lm", color = NA) +
  geom_point(alpha = 0.3) +
  # `.row` is a generated column providing a unique row number
  # to all rows in the bootstrapped data frame 
  geom_point(data = bs, aes(group = .row)) +
  geom_smooth(data = bs, method = "lm", fullrange = TRUE, se = FALSE) +
  facet_wrap(~KnownSex, scales = "free_x") +
  scale_color_manual(values = c(F = "#D55E00", M = "#0072B2"), guide = "none") +
  theme_bw() +
  transition_states(.draw, 1, 1) + 
  enter_fade() + 
  exit_fade()

Here’s what’s happening:

  • Claus loads in the BlueJays dataset, which contains some data on birds.
  • He then runs the ungezviz::bootstrapper function to generate a new dataset of bootstrapped samples.
  • Next, Claus uses ggplot2::geom_smooth(method = "lm") to run a linear model on the orginal BlueJays dataset, but does not color in the regression line (color = NA), thus showing only the confidence interval of the model.
  • Moreover, Claus uses ggplot2::geom_point(alpha = 0.3) to visualize the orginal data points, but slightly faded.
  • Subsequent, for each of the bootstrapped samples (group = .row), Claus again draws the data points (unfaded), and runs linear models while drawing only the regression line (se = FALSE).
  • Using ggplot2::facet_wrap, Claus seperates the data for BlueJays$KnownSex.
  • Using gganimate::transition_states(.draw, 1, 1), Claus prints each linear regression line to a row of the bootstrapped dataset only one second, before printing the next.

The result an astonishing GIF of the regression lines that could be fit to bootstrapped subsamples of the BlueJays data, along with their confidence interval:

One example of the practical use of ungeviz, original on its GitHub page

Another valuable use of the new package is the visualization of uncertainty from fitted models, for example as confidence strips. The below code shows the powerful combination of broom::tidy with ungeviz::stat_conf_strip to visualize effect size estimates of a linear model along with their confidence intervals.

library(broom)
#> 
#> Attaching package: 'broom'
#> The following object is masked from 'package:ungeviz':
#> 
#>     bootstrap

df_model <- lm(mpg ~ disp + hp + qsec, data = mtcars) %>%
  tidy() %>%
  filter(term != "(Intercept)")

ggplot(df_model, aes(estimate = estimate, moe = std.error, y = term)) +
  stat_conf_strip(fill = "lightblue", height = 0.8) +
  geom_point(aes(x = estimate), size = 3) +
  geom_errorbarh(aes(xmin = estimate - std.error, xmax = estimate + std.error), height = 0.5) +
  scale_alpha_identity() +
  xlim(-2, 1)

Visualizing effect size estimates with ungeviz, via its GitHub page

Very curious to see where this package develops into. What use cases can you think of?


R tips and tricks

R tips and tricks

Below are a dozen of very specific R tips and tricks. Some are valuable, useful, or boost your productivity. Others are just geeky funny. 

More general helpful R packages and resources can be found in this list.

If you have additions, please comment below or contact me!

Completely new to R? → Start here!

Table of Contents


Join 385 other subscribers

RStudio

Many more shortkeys available here online, and in your RStudio under Tools → Keyboard Shortcuts Help.

General

Disclaimer: This page contains one or more links to Amazon.
Any purchases made through those links provide us with a small commission that helps to host this blog.

Useful base functions

Back to Table of Contents

R Markdown

Data manipulation

Data visualization

Back to Table of Contents

Fun

Easter eggs

Join 385 other subscribers

Back to Table of Contents