Tag: figures

10 Simple Rules for Better Data Visualizations

10 Simple Rules for Better Data Visualizations

Nicolas Rougier, Michael Droettboom, Philip Bourne wrote an open access article for the Public Library of Open Science (PLOS) in 2014, proposing ten simple rules for better figures. Below I posted these 10 rules and quote several main sentences extracted from the original article.

Rule 1: Know Your Audience

It is important to identify, as early as possible in the design process, the audience and the message the visual is to convey. The graphical design of the visual should be informed by this intent. […] The general public may be the most difficult audience of all since you need to design a simple, possibly approximated, figure that reveals only the most salient part of your research.

Rule 2: Identify Your Message

It is important to clearly identify the role of the figure, i.e., what is the underlying message and how can a figure best express this message? […] Only after identifying the message will it be worth the time to develop your figure, just as you would take the time to craft your words and sentences when writing an article only after deciding on the main points of the text.

Rule 3: Adapt the Figure to the Support Medium

Ideally, each type of support medium requires a different figure, and you should abandon the practice of extracting a figure from your article to be put, as is, in your oral presentation. […] For example, during an oral presentation, a figure will be displayed for a limited time. Thus, the viewer must quickly understand what is displayed and what it represents while still listening to your explanation.

Rule 4: Captions Are Not Optional

The caption explains how to read the figure and provides additional precision for what cannot be graphically represented. This can be thought of as the explanation you would give during an oral presentation, or in front of a poster, but with the difference that you must think in advance about the questions people would ask. […] if there is a point of interest in the figure (critical domain, specific point, etc.), make sure it is visually distinct but do not hesitate to point it out again in the caption.

Rule 5: Do Not Trust the Defaults

All plots require at least some manual tuning of the different settings to better express the message, be it for making a precise plot more salient to a broad audience, or to choose the best colormap for the nature of the data.

Rule 6: Use Color Effectively

As explained by Edward Tufte [1], color can be either your greatest ally or your worst enemy if not used properly. If you decide to use color, you should consider which colors to use and where to use them. […] However, if you have no such need, you need to ask yourself, “Is there any reason this plot is blue and not black?”

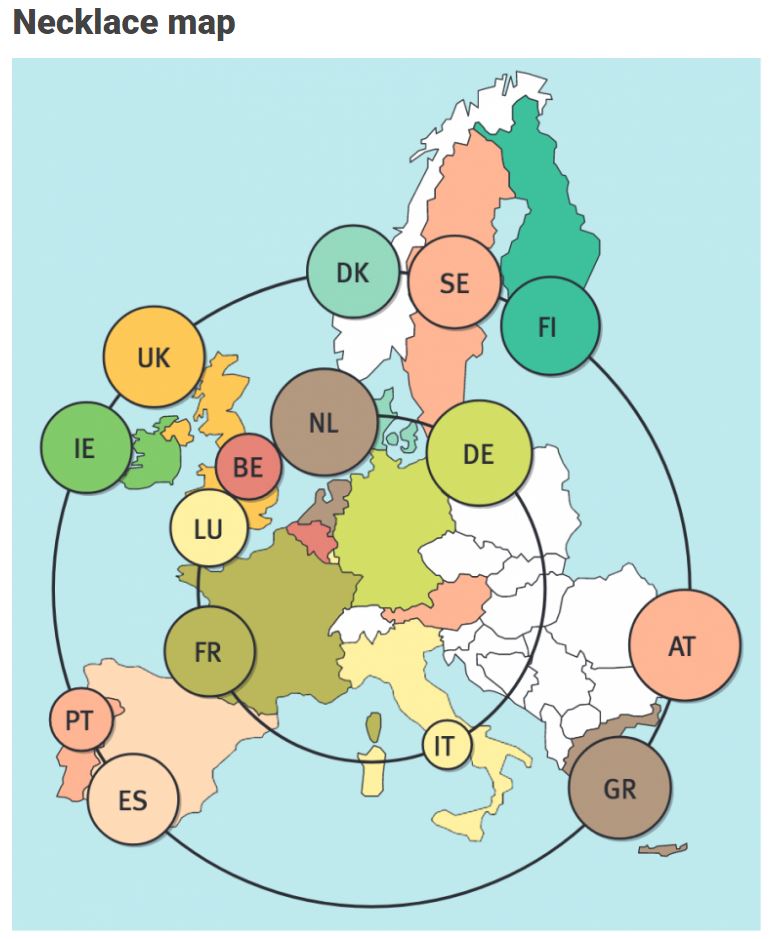
Rule 7: Do Not Mislead the Reader

What distinguishes a scientific figure from other graphical artwork is the presence of data that needs to be shown as objectively as possible. […] As a rule of thumb, make sure to always use the simplest type of plots that can convey your message and make sure to use labels, ticks, title, and the full range of values when relevant.

journal.pcbi.1003833.g006[2].png
Example from the paper on how visualization parameters can convey a misleading message.

Rule 8: Avoid “Chartjunk”

Chartjunk refers to all the unnecessary or confusing visual elements found in a figure that do not improve the message (in the best case) or add confusion (in the worst case). For example, chartjunk may include the use of too many colors, too many labels, gratuitously colored backgrounds, useless grid lines, etc. The term was first coined by Edward Tutfe [1]; he argues that any decorations that do not tell the viewer something new must be banned: “Regardless of the cause, it is all non-data-ink or redundant data-ink, and it is often chartjunk.” Thus, in order to avoid chartjunk, try to save ink, or electrons in the computing era.

Rule 9: Message Trumps Beauty

There exists a myriad of online graphics in which aesthetic is the first criterion and content comes in second place. Even if a lot of those graphics might be considered beautiful, most of them do not fit the scientific framework. Remember, in science, message and readability of the figure is the most important aspect while beauty is only an option.

Rule 10: Get the Right Tool

  • Matplotlib is a python plotting library, primarily for 2-D plotting, but with some 3-D support, which produces publication-quality figures in a variety of hardcopy formats and interactive environments across platforms. It comes with a huge gallery of examples that cover virtually all scientific domains (http://matplotlib.org/gallery.html).
  • is a language and environment for statistical computing and graphics. R provides a wide variety of statistical (linear and nonlinear modeling, classical statistical tests, time-series analysis, classification, clustering, etc.) and graphical techniques, and is highly extensible.
  • Inkscape is a professional vector graphics editor. It allows you to design complex figures and can be used, for example, to improve a script-generated figure or to read a PDF file in order to extract figures and transform them any way you like.
  • TikZ and PGF are TeX packages for creating graphics programmatically. TikZ is built on top of PGF and allows you to create sophisticated graphics in a rather intuitive and easy manner, as shown by the Tikz gallery (http://www.texample.net/tikz/examples/all/).
  • GIMP is the GNU Image Manipulation Program. It is an application for such tasks as photo retouching, image composition, and image authoring. If you need to quickly retouch an image or add some legends or labels, GIMP is the perfect tool.
  • ImageMagick is a software suite to create, edit, compose, or convert bitmap images from the command line. It can be used to quickly convert an image into another format, and the huge script gallery (http://www.fmwconcepts.com/imagemagick/index.php) by Fred Weinhaus will provide virtually any effect you might want to achieve.
  • D3.js (or just D3 for Data-Driven Documents) is a JavaScript library that offers an easy way to create and control interactive data-based graphical forms which run in web browsers, as shown in the gallery at http://github.com/mbostock/d3/wiki/Gallery.
  • Cytoscape is a software platform for visualizing complex networks and integrating these with any type of attribute data. If your data or results are very complex, cytoscape may help you alleviate this complexity.
  • Circos was originally designed for visualizing genomic data but can create figures from data in any field. Circos is useful if you have data that describes relationships or multilayered annotations of one or more scales.

You can download the PDF version of the full article here.

[1] Tufte EG (1983) The Visual Display of Quantitative Information. Cheshire, Connecticut: Graphics Press.


Visualizing model uncertainty

Visualizing model uncertainty

ungeviz is a new R package by Claus Wilke, whom you may know from his amazing work and books on Data Visualization. The package name comes from the German word “Ungewissheit”, which means uncertainty. You can install the developmental version via:

devtools::install_github("clauswilke/ungeviz")

The package includes some bootstrapping functionality that, when combined with ggplot2 and gganimate, can produce some seriousy powerful visualizations. For instance, take the below piece of code:

data(BlueJays, package = "Stat2Data")

# set up bootstrapping object that generates 20 bootstraps
# and groups by variable `KnownSex`
bs <- ungeviz::bootstrapper(20, KnownSex)

ggplot(BlueJays, aes(BillLength, Head, color = KnownSex)) +
  geom_smooth(method = "lm", color = NA) +
  geom_point(alpha = 0.3) +
  # `.row` is a generated column providing a unique row number
  # to all rows in the bootstrapped data frame 
  geom_point(data = bs, aes(group = .row)) +
  geom_smooth(data = bs, method = "lm", fullrange = TRUE, se = FALSE) +
  facet_wrap(~KnownSex, scales = "free_x") +
  scale_color_manual(values = c(F = "#D55E00", M = "#0072B2"), guide = "none") +
  theme_bw() +
  transition_states(.draw, 1, 1) + 
  enter_fade() + 
  exit_fade()

Here’s what’s happening:

  • Claus loads in the BlueJays dataset, which contains some data on birds.
  • He then runs the ungezviz::bootstrapper function to generate a new dataset of bootstrapped samples.
  • Next, Claus uses ggplot2::geom_smooth(method = "lm") to run a linear model on the orginal BlueJays dataset, but does not color in the regression line (color = NA), thus showing only the confidence interval of the model.
  • Moreover, Claus uses ggplot2::geom_point(alpha = 0.3) to visualize the orginal data points, but slightly faded.
  • Subsequent, for each of the bootstrapped samples (group = .row), Claus again draws the data points (unfaded), and runs linear models while drawing only the regression line (se = FALSE).
  • Using ggplot2::facet_wrap, Claus seperates the data for BlueJays$KnownSex.
  • Using gganimate::transition_states(.draw, 1, 1), Claus prints each linear regression line to a row of the bootstrapped dataset only one second, before printing the next.

The result an astonishing GIF of the regression lines that could be fit to bootstrapped subsamples of the BlueJays data, along with their confidence interval:

One example of the practical use of ungeviz, original on its GitHub page

Another valuable use of the new package is the visualization of uncertainty from fitted models, for example as confidence strips. The below code shows the powerful combination of broom::tidy with ungeviz::stat_conf_strip to visualize effect size estimates of a linear model along with their confidence intervals.

library(broom)
#> 
#> Attaching package: 'broom'
#> The following object is masked from 'package:ungeviz':
#> 
#>     bootstrap

df_model <- lm(mpg ~ disp + hp + qsec, data = mtcars) %>%
  tidy() %>%
  filter(term != "(Intercept)")

ggplot(df_model, aes(estimate = estimate, moe = std.error, y = term)) +
  stat_conf_strip(fill = "lightblue", height = 0.8) +
  geom_point(aes(x = estimate), size = 3) +
  geom_errorbarh(aes(xmin = estimate - std.error, xmax = estimate + std.error), height = 0.5) +
  scale_alpha_identity() +
  xlim(-2, 1)
Visualizing effect size estimates with ungeviz, via its GitHub page
Very curious to see where this package develops into. What use cases can you think of?


Xenographics: Unusual charts and maps

Xenographics: Unusual charts and maps

Xeno.graphics is the collection of unusual charts and maps Maarten Lambrechts maintains. It’s a repository of novel, innovative, and experimental visualizations to inspire you, to fight xenographphobia, and popularize new chart types.

For instance, have you ever before heard of a time curve? These are very useful to visualize the development of a relationship over time.

temp.JPG
Time curves are based on the metaphor of folding a timeline visualization into itself so as to bring similar time points close to each other. This metaphor can be applied to any dataset where a similarity metric between temporal snapshots can be defined, thus it is largely datatype-agnostic. [https://xeno.graphics/time-curve]
The upset plot is another example of an upcoming visualization. It can demonstrate the overlap or insection in a dataset. For instance, in the social network of #rstats twitter heroes, as the below example from the Xenographics website does.

temp.JPG
Understanding relationships between sets is an important analysis task. The major challenge in this context is the combinatorial explosion of the number of set intersections if the number of sets exceeds a trivial threshold. To address this, we introduce UpSet, a novel visualization technique for the quantitative analysis of sets, their intersections, and aggregates of intersections. [https://xeno.graphics/upset-plot/]
The below necklace map is new to me too. What it does precisely is unclear to me as well.

temp
In a necklace map, the regions of the underlying two-dimensional map are projected onto intervals on a one-dimensional curve (the necklace) that surrounds the map regions. Symbols are scaled such that their area corresponds to the data of their region and placed without overlap inside the corresponding interval on the necklace. [https://xeno.graphics/necklace-map/]
There are hundreds of other interestingcharts, maps, figures, and plots, so do have a look yourself. Moreover, the xenographics collection is still growing. If you know of one that isn’t here already, please submit it. You can also expect some posts about  certain topics around xenographics.

temp.JPG

ggstatsplot: Creating graphics including statistical details

ggstatsplot: Creating graphics including statistical details

This pearl had been resting in my inbox for quite a while before I was able to add it to my R resources list. Citing its GitHub pageggstatsplot is an extension of ggplot2 package for creating graphics with details from statistical tests included in the plots themselves and targeted primarily at behavioral sciences community to provide a one-line code to produce information-rich plots. The package is currently maintained and still under development by Indrajeet Patil. Nevertheless, its functionality is already quite impressive. You can download the latest stable version via:

utils::install.packages(pkgs = "ggstatsplot")

Or download the development version via:

devtools::install_github(
  repo = "IndrajeetPatil/ggstatsplot", # package path on GitHub
  dependencies = TRUE,                 # installs packages which ggstatsplot depends on
  upgrade_dependencies = TRUE          # updates any out of date dependencies
)

The package currently supports many different statistical plots, including:

?ggbetweenstats
?ggscatterstats
?gghistostats
?ggpiestats
?ggcorrmat
?ggcoefstats
?combine_plots
?grouped_ggbetweenstats
?grouped_ggscatterstats
?grouped_gghistostats
?grouped_ggpiestats
?grouped_ggcorrmat

Let’s take a closer look at the first one:

ggbetweenstats

This function creates either a violin plot, a box plot, or a mix of two for between-group or between-condition comparisons and additional detailed results from statistical tests can be added in the subtitle. The simplest function call looks like the below, but much more complex information can be added and specified.

set.seed(123) # to get reproducible results

# the functions work approximately the same as ggplot2
ggstatsplot::ggbetweenstats(
  data = datasets::iris, 
  x = Species, 
  y = Sepal.Length,
  messages = FALSE
) +   
# and can be adjusted using the same, orginal function calls
  ggplot2::coord_cartesian(ylim = c(3, 8)) + 
  ggplot2::scale_y_continuous(breaks = seq(3, 8, by = 1))
All pictures copied from the GitHub page of ggstatsplot [original]

ggscatterstats

Not all plots are ggplot2-compatible though, for instance, ggscatterstats is not. Nevertheless, it produces a very powerful plot in my opinion.

ggstatsplot::ggscatterstats(
  data = datasets::iris, 
  x = Sepal.Length, 
  y = Petal.Length,
  title = "Dataset: Iris flower data set",
  messages = FALSE
)
All pictures copied from the GitHub page of ggstatsplot [original]

ggcormat

ggcorrmat is also quite impressive, producing correlalograms with only minimal amounts of code as it wraps around ggcorplot. The defaults already produces publication-ready correlation matrices:

ggstatsplot::ggcorrmat(
  data = datasets::iris,
  corr.method = "spearman",
  sig.level = 0.005,
  cor.vars = Sepal.Length:Petal.Width,
  cor.vars.names = c("Sepal Length", "Sepal Width", "Petal Length", "Petal Width"),
  title = "Correlalogram for length measures for Iris species",
  subtitle = "Iris dataset by Anderson",
  caption = expression(
    paste(
      italic("Note"),
      ": X denotes correlation non-significant at ",
      italic("p "),
      "< 0.005; adjusted alpha"
    )
  )
)
All pictures copied from the GitHub page of ggstatsplot [original]

ggcoefstats

Finally, ggcoefstats is a wrapper around GGally::ggcoef, creating a plot with the regression coefficients’ point estimates as dots with confidence interval whiskers. Here’s an example with some detailed specifications:

ggstatsplot::ggcoefstats(
  x = stats::lm(formula = mpg ~ am * cyl,
                data = datasets::mtcars),
  point.color = "red",
  vline.color = "#CC79A7",
  vline.linetype = "dotdash",
  stats.label.size = 3.5,
  stats.label.color = c("#0072B2", "#D55E00", "darkgreen"),
  title = "Car performance predicted by transmission and cylinder count",
  subtitle = "Source: 1974 Motor Trend US magazine"
) +                                    
  ggplot2::scale_y_discrete(labels = c("transmission", "cylinders", "interaction")) +
  ggplot2::labs(x = "regression coefficient",
                y = NULL)

All pictures copied from the GitHub page of ggstatsplot [original]
I for one am very curious to see how Indrajeet will further develop this package, and whether academics will start using it as a default in publishing.